Building a Garmin Dashboard - Automating Data Persistence with AWS SAM and Lambda
Introduction
I recently purchased a Garmin watch to track my daily activity and workouts. I was interested in the data that Garmin collects and wanted to build a dashboard to visualize it. As usual I can’t just be content with the tools provided by Garmin, I wanted to build my own dashboard.
I also wanted to automate the data collection process so that my dashboard would always be up to date. That is the focus of this post. I will cover the data collection process and how I automated it using AWS SAM and Lambda.
If you are interested in a flexible pattern for downloading data on a schedule then this post is for you. I would recommend playing along at home by applying this pattern to your own data collection needs.
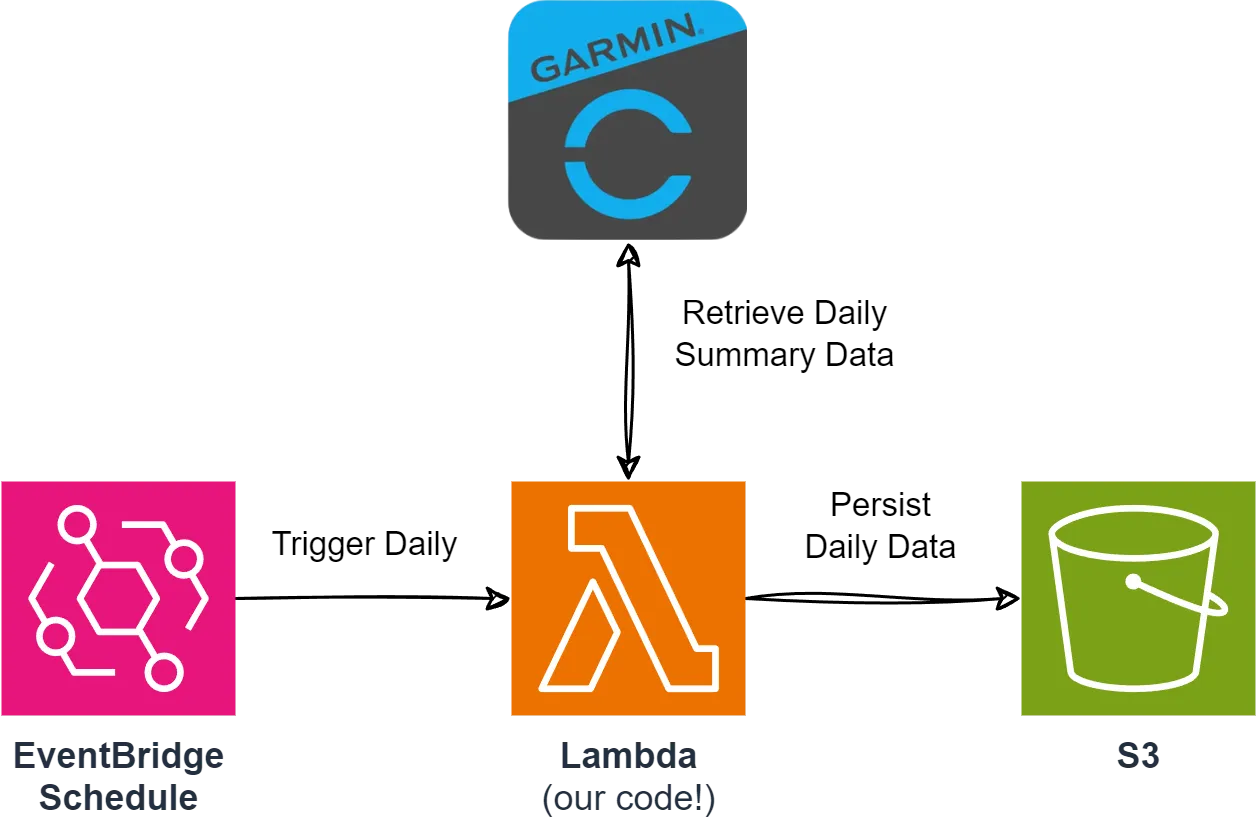
The final architecture will look something like this - but the Garmin Connect API could be replaced with any data source!
Requirements
You will need the following to follow along with this post:
- An AWS account
- AWS CLI installed and configured with credentials.
- Python3
- Docker Desktop
- While not strictly required, I would recommend installing Docker Desktop to test the Lambda function locally.
AWS SAM project setup
We will be using AWS SAM to deploy our Lambda function. If you are not familiar with AWS SAM I would recommend reading the What is the AWS Serverless Application Model guide very briefly. The TLDR is that AWS SAM helps deploy small serverless applications to AWS without needing to mess around in the AWS console.
Start by installing the AWS SAM CLI:
pip install aws-sam-cli
Run the following command to create a new AWS SAM project - Select the following options:
- Template source: AWS Quick Start Templates
- Template: 1 - Hello World Example
- Use the most popular package type? (Python and zip) [y/N]: y
- enable X-Ray tracing on the function? [y/N]: N
- enable monitoring using CloudWatch? [y/N]: N
- Project name [sam-app]: garmin-connect-aws-dashboard
$ sam init

# You can preselect a particular runtime or package type when using the `sam init` experience.
# Call `sam init --help` to learn more.

# Which template source would you like to use?
# 1 - AWS Quick Start Templates
# 2 - Custom Template Location
# Choice: 1

# Choose an AWS Quick Start application template
# 1 - Hello World Example
# 2 - Data processing
# 3 - Hello World Example with Powertools for AWS Lambda
# 4 - Multi-step workflow
# 5 - Scheduled task
# 6 - Standalone function
# 7 - Serverless API
# 8 - Infrastructure event management
# 9 - Lambda Response Streaming
# 10 - Serverless Connector Hello World Example
# 11 - Multi-step workflow with Connectors
# 12 - GraphQLApi Hello World Example
# 13 - Full Stack
# 14 - Lambda EFS example
# 15 - Hello World Example With Powertools for AWS Lambda
# 16 - DynamoDB Example
# 17 - Machine Learning
# Template: 1

# Use the most popular runtime and package type? (Python and zip) [y/N]: y
# Would you like to enable X-Ray tracing on the function(s) in your application?  [y/N]: N
# Would you like to enable monitoring using CloudWatch Application Insights?
# For more info, please view https://docs.aws.amazon.com/AmazonCloudWatch/latest/monitoring/cloudwatch-application-insights.html [y/N]: N

# Project name [sam-app]: garmin-connect-aws-dashboard
Change into the new project directory - and take a look around - feel free to open the project in your favorite IDE (like VScode).
cd garmin-connect-aws-dashboard
code .
Modify the project
Before we start working on the project, we’ll make some modifications and delete some files that we don’t need.
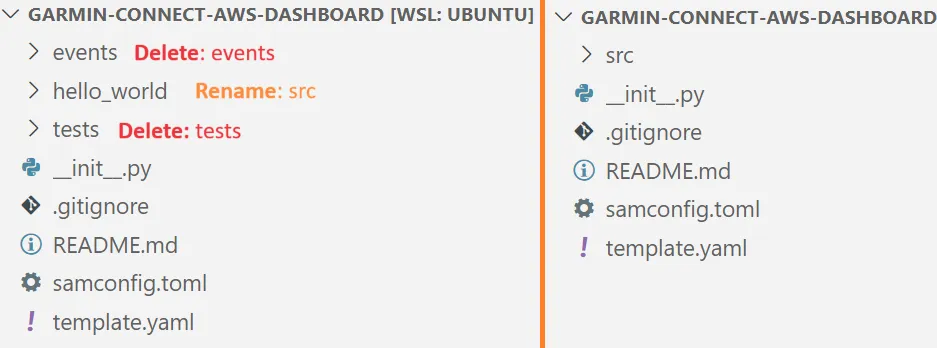
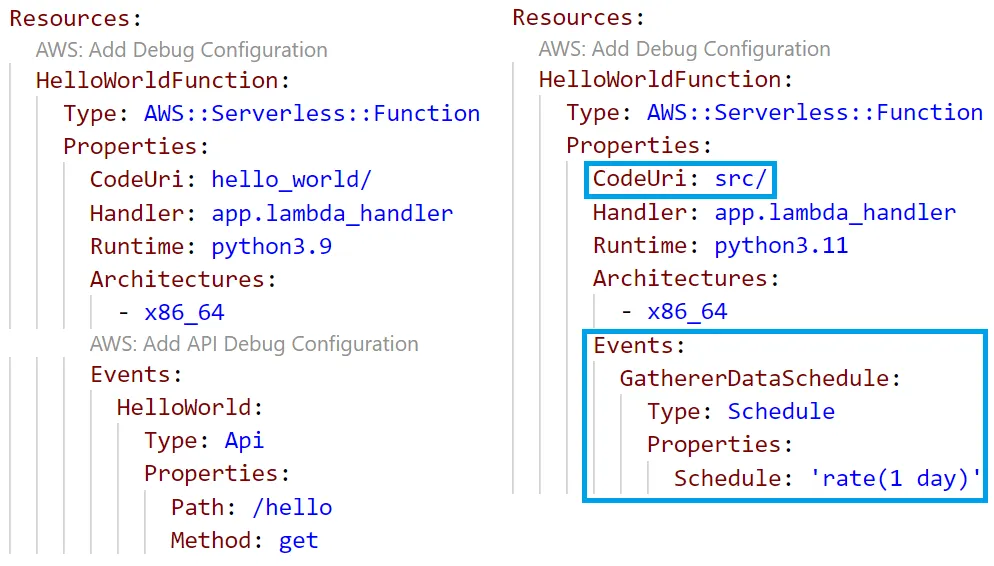
Then, open the template.yaml file and modify the HelloWorldFunction to look like the following instead
You should also delete the Outputs section of the template.yaml file.
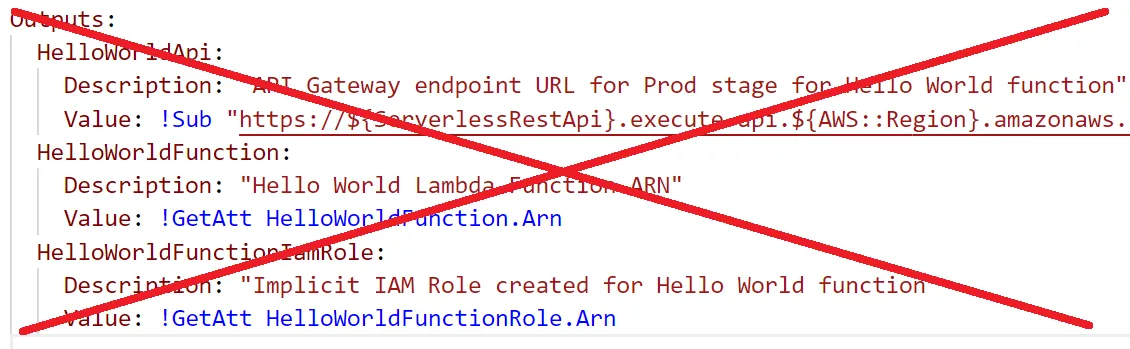
The template.yaml file should now look like this:
Note: I would recommend increasing the
Timeoutto 30 seconds. The default is 3 seconds which is usually not enough time for Lambda functions that make external API calls.
AWSTemplateFormatVersion: '2010-09-09'
Transform: AWS::Serverless-2016-10-31
Description: >
  garmin-connect-aws-dashboard - Sample SAM Template for garmin-connect-aws-dashboard

Globals:
  Function:
    Timeout: 30 # I would recommend increasing this to 30 seconds
    MemorySize: 128

Resources:
  HelloWorldFunction:
    Type: AWS::Serverless::Function
    Properties:
      CodeUri: src/
      Handler: app.lambda_handler
      Runtime: python3.11
      Architectures:
        - x86_64
      Events:
        GathererDataSchedule:
          Type: Schedule
          Properties:
            Schedule: 'rate(1 day)'
Now that we have the project setup, we can start working on the code - right now the project is just a simple Lambda function that is triggered on a schedule - and whatever code is in the app.py file will be executed.
So let’s start by adding some code to the app.py file.
Add basic Lambda function code
Take a look at the app.py file in the src directory. By default it has a simple lambda_handler function that returns a 200 response. For now replace the contents of the app.py file with the following:
def lambda_handler(event, context):
    try:
        print("Testing lambda function")
    except Exception as e:
        print(e)
This is a simple function that will print “Testing lambda function” when the Lambda function is executed. We will use this to test that our Lambda function is working as expected.
You can test the function locally by running the following command:
Note: You will need to have Docker installed and running on your machine to run the following command - If you don’t have Docker, skip to the next step.
$ sam local invoke
# Invoking app.lambda_handler (python3.11)
# Local image is up-to-date
# Using local image: public.ecr.aws/lambda/python:3.11-rapid-x86_64.

# Mounting
# /home/nathan/Projects/aws/garmin-connect-aws-dashboard/src
# as /var/task:ro,delegated, inside runtime container
# START RequestId: c9933b0e-8bc4-419d-ba0d-11cdf4e1ed82 Version: $LATEST
# Testing lambda function
# etc....
If you don’t have Docker installed, you will need to add the following to the end of the src/app.py file -
Note: This should be removed before deploying to AWS.
if __name__ == '__main__':
    lambda_handler({},{})

# Remove the code by commenting it out like this:
# if __name__ == '__main__':
#     lambda_handler({},{})
Then you can run the following command to test the function locally:
$ python src/app.py
# Testing lambda function
Deploy the Lambda function
Now that we have a basic Lambda function, we can deploy it to AWS. Run the following command to deploy the function:
You should first have setup and configured the AWS CLI with your credentials. You need an IAM User and Access Key/Secret Key put into your ~/.aws/credentials file.
Note: It is extremely important that you do not commit your credentials to source control OR share them with anyone.
[default]
aws_access_key_id=XXXXXXXXX
aws_secret_access_key=XXXXXXXXX
I also recommend setting a default region in your ~/.aws/config file:
[default]
region = ap-southeast-2
output = json
You can test that your credentials are working by running the following command:
$ aws sts get-caller-identity
{
    "UserId": "nathan",
    "Account": "XXXXXXXXXXXX",
    "Arn": "arn:aws:iam::XXXXXXXXXXXX:user/nathan"
}
Now that we have our credentials setup, we can deploy the Lambda function to AWS. Run the following command:
You can pretty much mash Enter for all the questions - The only two you might want to change are:
- Stack Name if the default doesn’t make sense for your project.
- Region if you want to deploy to a different region - I deployed to
ap-southeast-2because that is the region closest to me.
$ sam deploy --guided
# Configuring SAM deploy
# ======================

# Looking for config file [samconfig.toml] :  Found
# Reading default arguments  :  Success

# Setting default arguments for 'sam deploy'
# =========================================
# Stack Name [garmin-connect-aws-dashboard]: garmin-connect-aws-dashboard
# AWS Region [ap-southeast-2]:
#
# Shows you resources changes to be deployed and require a 'Y' to initiate deploy
# Confirm changes before deploy [Y/n]:
#
# SAM needs permission to be able to create roles to connect to the resources in your template
# Allow SAM CLI IAM role creation [Y/n]:
#
# Preserves the state of previously provisioned resources when an operation fails
# Disable rollback [y/N]:
# Save arguments to configuration file [Y/n]:
# SAM configuration file [samconfig.toml]:
# SAM configuration environment [default]:
You should also be prompted before the deployment starts - type y to confirm the deployment.
# Previewing CloudFormation changeset before deployment
# ======================================================
# Deploy this changeset? [y/N]: y

# 2023-10-15 18:28:15 - Waiting for stack create/update to complete

# CloudFormation events from stack operations (refresh every 5.0 seconds)
# -----------------------------------------------------------------------------------------------------------------
# ResourceStatus               ResourceType                 LogicalResourceId            ResourceStatusReason
# -----------------------------------------------------------------------------------------------------------------
# CREATE_IN_PROGRESS           AWS::CloudFormation::Stack   garmin-connect-aws-          User Initiated
#                                                           dashboard
# CREATE_IN_PROGRESS           AWS::IAM::Role               HelloWorldFunctionRole       -
# CREATE_IN_PROGRESS           AWS::IAM::Role               HelloWorldFunctionRole       Resource creation
#                                                                                        Initiated
# CREATE_COMPLETE              AWS::IAM::Role               HelloWorldFunctionRole       -
# CREATE_IN_PROGRESS           AWS::Lambda::Function        HelloWorldFunction           -
# CREATE_IN_PROGRESS           AWS::Lambda::Function        HelloWorldFunction           Resource creation
#                                                                                        Initiated
# CREATE_COMPLETE              AWS::Lambda::Function        HelloWorldFunction           -
# CREATE_IN_PROGRESS           AWS::Events::Rule            HelloWorldFunctionGatherer   -
#                                                           DataSchedule
# CREATE_IN_PROGRESS           AWS::Events::Rule            HelloWorldFunctionGatherer   Resource creation
#                                                           DataSchedule                 Initiated
# CREATE_COMPLETE              AWS::Events::Rule            HelloWorldFunctionGatherer   -
#                                                           DataSchedule
# CREATE_IN_PROGRESS           AWS::Lambda::Permission      HelloWorldFunctionGatherer   -
#                                                           DataSchedulePermission
# CREATE_IN_PROGRESS           AWS::Lambda::Permission      HelloWorldFunctionGatherer   Resource creation
#                                                           DataSchedulePermission       Initiated
# CREATE_COMPLETE              AWS::Lambda::Permission      HelloWorldFunctionGatherer   -
#                                                           DataSchedulePermission
# CREATE_COMPLETE              AWS::CloudFormation::Stack   garmin-connect-aws-          -
#                                                           dashboard
# -----------------------------------------------------------------------------------------------------------------


# Successfully created/updated stack - garmin-connect-aws-dashboard in ap-southeast-2
Finally to test that the Lambda function is working, run the following command:
Note: If any of the following commands fail you might need to include the
--regionflag and specify the region you deployed to - add the following to the command if you have issues:--region <your_region>.
$ sam remote invoke
# Invoking Lambda Function HelloWorldFunction
# START RequestId: 46b43519-0dfb-4ae2-a9a2-d0a21f0721c6 Version: $LATEST
# Testing lambda function
# END RequestId: 46b43519-0dfb-4ae2-a9a2-d0a21f0721c6
# REPORT RequestId: 46b43519-0dfb-4ae2-a9a2-d0a21f0721c6
Then check the logs by running the following command:
sam logs
# 2023-10-15T10:32:08.883000 INIT_START Runtime Version: python:3.11.v14
# Runtime Version ARN: arn:aws:lambda:ap-southeast-2::runtime:9c87c21a94b293e1a306aad2c23cfa6928e7a79a3d3356158b15f4cbe880b390
# 2023-10-15T10:32:08.993000 START RequestId: 46b43519-0dfb-4ae2-a9a2-d0a21f0721c6 Version: $LATEST
# 2023-10-15T10:32:08.994000 Testing lambda function
# ...
Great! We have a great foundation to build on - whenever you make changes to the code, you can run the following command to deploy the changes:
$ sam build
$ sam deploy
Adding an S3 bucket to store the data
The next item to add to our project is an S3 bucket to store the data we download each day. An S3 bucket is a cheap and easy way to store data in AWS - and on most data projects it is the first place I start.
To add an S3 bucket to our project, open the template.yaml file and add the following to the Resources section:
  S3Bucket:
    Type: AWS::S3::Bucket
    Properties:
      BucketName: !Sub nathans-cool-garmin-connect-aws-dashboard
  ...
This will create an S3 bucket in AWS with a random name - If you would like to name it, you can optionally specify a name in the BucketName property. Note that the bucket name must be unique across all of AWS - so you might not be able to use the name you want.
Then, under the HelloWorldFunction add the following:
    Properties:
      ...
      Policies:
        - S3CrudPolicy:
            BucketName: !Ref S3Bucket
      Environment:
        Variables:
          GARMIN_S3_BUCKET: !Ref S3Bucket
Without going into too much detail, this will give the Lambda function permission to read and write (CRUD - create, read, update, delete) to the S3 bucket. It will also set an environment variable called GARMIN_S3_BUCKET that we will use later.
!Ref S3Bucket is a special function that will get the name of the S3 bucket we created earlier - S3Bucket must match the name of the resouce specified in the Resources section (this is different to the BucketName property).
The template.yaml file should now look like this:
AWSTemplateFormatVersion: '2010-09-09'
Transform: AWS::Serverless-2016-10-31
Description: >
  garmin-connect-aws-dashboard - Sample SAM Template for garmin-connect-aws-dashboard

Globals:
  Function:
    Timeout: 30
    MemorySize: 128

Resources:
  S3Bucket:
    Type: AWS::S3::Bucket
    Properties:
      BucketName: !Sub nathans-cool-garmin-connect-aws-dashboard

  HelloWorldFunction:
    Type: AWS::Serverless::Function
    Properties:
      CodeUri: src/
      Handler: app.lambda_handler
      Runtime: python3.11
      Architectures:
        - x86_64
      Events:
        GathererDataSchedule:
          Type: Schedule
          Properties:
            Schedule: 'rate(1 day)'
      Policies:
        - S3CrudPolicy:
            BucketName: !Ref S3Bucket
      Environment:
        Variables:
          GARMIN_S3_BUCKET: !Ref S3Bucket
Head over to the src/app.py file and lets add some code that will create a file in the S3 bucket we just created.
Add the following code to the app.py file:
import datetime
import json
import os
import uuid

import boto3

def lambda_handler(event, context):
    s3_client = boto3.client('s3')
    garmin_s3_bucket = os.environ['GARMIN_S3_BUCKET']

    sample_json_data = {
        "hello": "world"
    }

    try:
        print("Uploading {} to {}".format(sample_json_data, garmin_s3_bucket))

        s3_client.put_object(
            Bucket=garmin_s3_bucket,
            Key=f'data/{datetime.date.today().isoformat()}/{uuid.uuid4()}.json',
            Body=json.dumps(sample_json_data)
        )
    except Exception as e:
        print(e)
This code does the following:
- Creates a new S3 client using the
boto3library - boto3 is a library that allows us to interact with AWS services in python - Gets the name of the S3 bucket from the
GARMIN_S3_BUCKETenvironment variable - Creates a sample JSON object
- Uploads the JSON object to the S3 bucket with the following properties:
- The file will be stored in the
datafolder - The file will be stored in a folder with the current date
- The file will have a random UUID as the name
- The file will be a JSON file with the contents of the
sample_json_datavariable
- The file will be stored in the
Run the following command to deploy the changes:
$ sam build
$ sam deploy
# Deploy this changeset? [y/N]: y
Then run the following command to test the Lambda function:
$ sam remote invoke
# Invoking Lambda Function HelloWorldFunction
# START RequestId: 06913592-3131-43f0-818d-7447f865b7b3 Version: $LATEST
# Uploading {'hello': 'world'} to nathans-cool-garmin-connect-aws-dashboard
# ...
Now if everthing worked as expected, you should see a new file in the S3 bucket with the contents of the sample_json_data variable.
You can check this by navigating to the AWS Console for S3 and checking the contents of the S3 bucket.
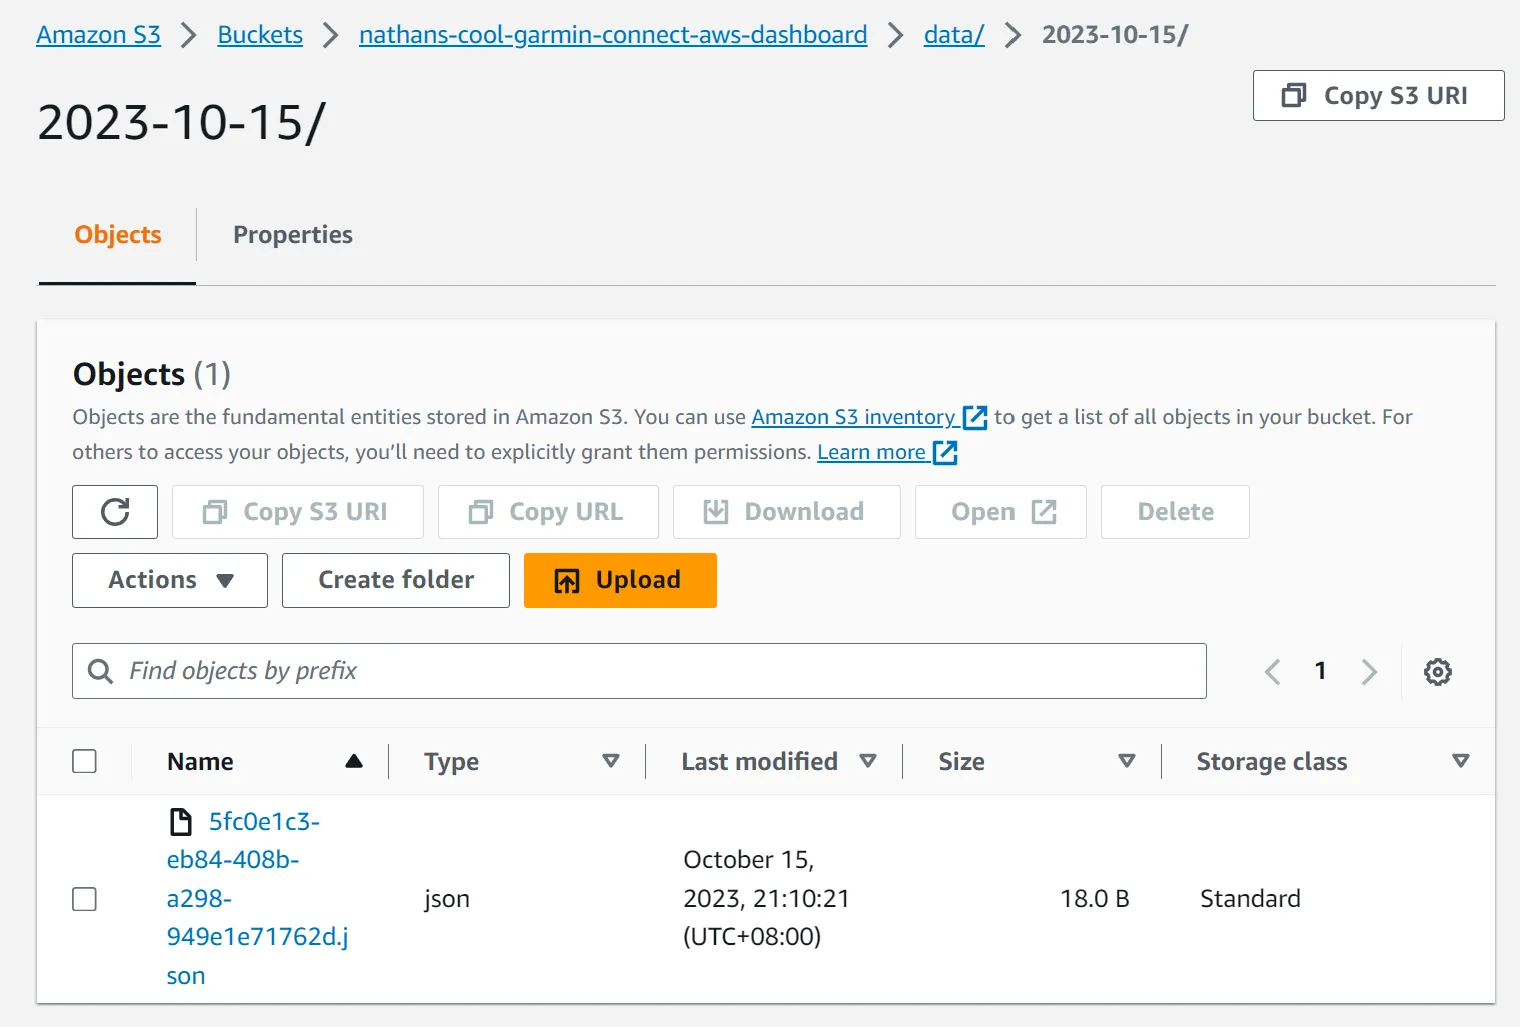
You could also run the following command to list the contents of the S3 bucket - replace nathans-cool-garmin-connect-aws-dashboard with the name of your S3 bucket.
$ aws s3 ls s3://nathans-cool-garmin-connect-aws-dashboard/data/
# PRE 2023-10-15/

# This provides you with a list of folders under the `data` folder -
# you can then list the contents of a folder like this:

$ aws s3 ls s3://nathans-cool-garmin-connect-aws-dashboard/data/2023-10-15/
# 2023-10-15 21:10:21         18 5fc0e1c3-eb84-408b-a298-949e1e71762d.json

# Finally, you can download the file like this:
$ aws s3 cp s3://nathans-cool-garmin-connect-aws-dashboard/data/2023-10-15/5fc0e1c3-eb84-408b-a298-949e1e71762d.json .

# The file will be downloaded to your current directory
$ cat 5fc0e1c3-eb84-408b-a298-949e1e71762d.json
# {"hello": "world"}
So, to recap - we have a Lambda function that is triggered on a schedule. The Lambda function creates a JSON object and uploads it to an S3 bucket under a date folder for each day.
This is an excellent foundation for our data collection process - we can now start to build on this to download data from Garmin Connect.
Downloading data from Garmin Connect
The particular data that I am interested in can be downloaded from the unoffical Garmin Connect API. There’s a neat library someone has written to do all the heavy lifting called garth.
This is a good opportunity to introduce you to how you can include 3rd party libraries in your Lambda functions code!
Take a look at the src/requirements.txt file that should have been created for you when you created the project. This file is used to specify the 3rd party libraries that you want to include in your Lambda function - right now there’s likely only one line in the file:
requests
We are going to update this to include two libraries:
boto3
garth==0.4.38
Note that you can specify the version of the library you want to include - this isn’t required but it is recommended to ensure your code doesn’t break if the library is updated.
If you were wanting to work with any other data science libraries like numpy or pandas you would include them here as well!
Now, lets update the src/app.py file to download some data from Garmin Connect.
import datetime
import json
import os
import uuid

import boto3
from garth.http import Client


def sleep_data(garth_client):
    try:
        return garth_client.connectapi(
            f"/wellness-service/wellness/dailySleepData/{garth_client.username}",
            params={"date": datetime.date.today().isoformat(),
                    "nonSleepBufferMinutes": 60},
        )
    except Exception as e:
        print(e)


def lambda_handler(event, context):
    s3_client = boto3.client('s3')
    garmin_s3_bucket = os.environ['GARMIN_S3_BUCKET']
    garmin_username = os.environ['GARMIN_USERNAME']
    garmin_password = os.environ['GARMIN_PASSWORD']

    garth_client = Client()
    garth_client.login(garmin_username, garmin_password)

    try:
        sleep_json_data = sleep_data(garth_client=garth_client)
        print("Uploading sleep data to {}".format(garmin_s3_bucket))

        s3_client.put_object(
            Bucket=garmin_s3_bucket,
            Key=f'sleep/{datetime.date.today().isoformat()}/{uuid.uuid4()}.json',
            Body=json.dumps(sleep_json_data)
        )
    except Exception as e:
        print(e)
A lot of code changes, but nothing too complicated. Lets break it down:
- We import the garth library that we will use to download the data from Garmin Connect
- We create a new function called
sleep_datathat will download the sleep data from Garmin Connect. The specifics on how this function works are out of scope of this blog post - but you can read the garth documentation for more information. - We create a new
garth_clientand login to Garmin Connect using the username and password environment variables - We call the
sleep_datafunction to download the sleep data - We upload the sleep data to the S3 bucket
A change that we do need to make before this will work is to add the GARMIN_USERNAME and GARMIN_PASSWORD environment variables to the template.yaml file.
Add the following to the Environment section of the HelloWorldFunction:
      Environment:
        Variables:
          GARMIN_S3_BUCKET: !Ref S3Bucket
          GARMIN_USERNAME: "YourUserHere"
          GARMIN_PASSWORD: "YourPasswordHere"
Note: This is NOT a good way to store your username and password - but it is the easiest way to get started. If you would like to see how you can use AWS Secrets Manager to store your username and password, checkout the t04glover/garmin-connect-aws-dashboard repository on GitHub.
Run the following command to deploy the changes:
$ sam build
$ sam deploy
# Deploy this changeset? [y/N]: y
Then run the following command to test the Lambda function:
$ sam remote invoke
Now if everthing worked as expected, you should see a new file in the S3 bucket with the contents of the sleep data.
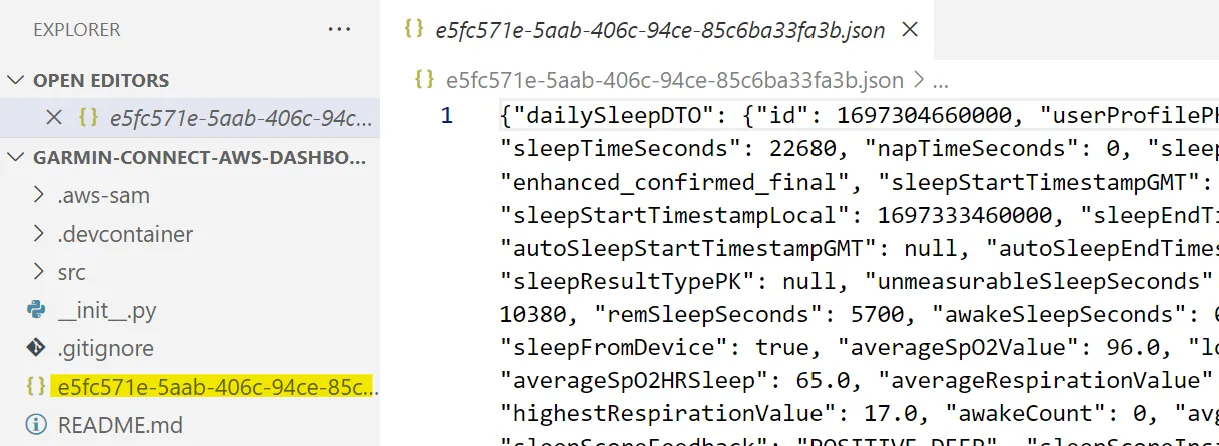
$ aws s3 ls s3://nathans-cool-garmin-connect-aws-dashboard/sleep/2023-10-15/
# 2023-10-15 13:53:28     174051 e5fc571e-5aab-406c-94ce-85c6ba33fa3b.json

$ aws s3 cp s3://nathans-cool-garmin-connect-aws-dashboard/sleep/2023-10-15/e5fc571e-5aab-406c-94ce-85c6ba33fa3b.json .
$ cat e5fc571e-5aab-406c-94ce-85c6ba33fa3b.json
Check the file and confirm that it contains the sleep data.
Clean up [Optional]
If you are done with the project, you can delete it by running the following command:
$ sam delete
# Are you sure you want to delete the stack garmin-connect-aws-dashboard in the region ap-southeast-2 ? [y/N]:
# Are you sure you want to delete the folder garmin-connect-aws-dashboard in S3 which contains the artifacts? [y/N]: y
Note: You will need to delete the S3 bucket (the custom one we made) manually - you can do this by navigating to the AWS Console for S3 and emptying then deleting the bucket.
Conclusion
We covered a lot in this post - we started with a simple Lambda function that was triggered on a schedule. We then added an S3 bucket to store the data and finally we added some code to download data from Garmin Connect.
This is only the beginning - in future posts we will cover how to build a dashboard to visualize the data we are collecting.
If this post was helpful, I’d love to hear more about what you are building - feel free to reach out to me on Twitter or LinkedIn.