Small AWS Greengrass v2 tips for big observability gains

This post aims to cover off a number of small tips and tricks that you can use to improve your AWS Greengrass v2 observability. While not meant to be a comprehensive guide, I hope that you can take away some of these tips and apply them to your own Greengrass projects.
Hopefully over time, I will be able to add to this post with more tips and tricks as I come across them. If you have any tips or tricks that you would like to share, please feel free to reach out to me on Twitter or LinkedIn.
Currently, this post covers the following components:
- aws.greengrass.LocalDebugConsole - https://docs.aws.amazon.com/greengrass/v2/developerguide/local-debug-console-component.html
- aws.greengrass.LogManager - https://docs.aws.amazon.com/greengrass/v2/developerguide/log-manager-component.html
Prerequisites
If you are interested in following along with this post practically, you can follow some of my previous posts to get setup! But if you already have a Greengrass device or are just interested in a read, feel free to skip this section.
-
Read
-
Install the following tools onto your system
-
Create or Clone the following repositories
- t04glovern/aws-greengrass-bricks - The repository used in this blog post as a sample. We will be working from the
greengrass-observabilityfolder.
- t04glovern/aws-greengrass-bricks - The repository used in this blog post as a sample. We will be working from the
aws.greengrass.LocalDebugConsole
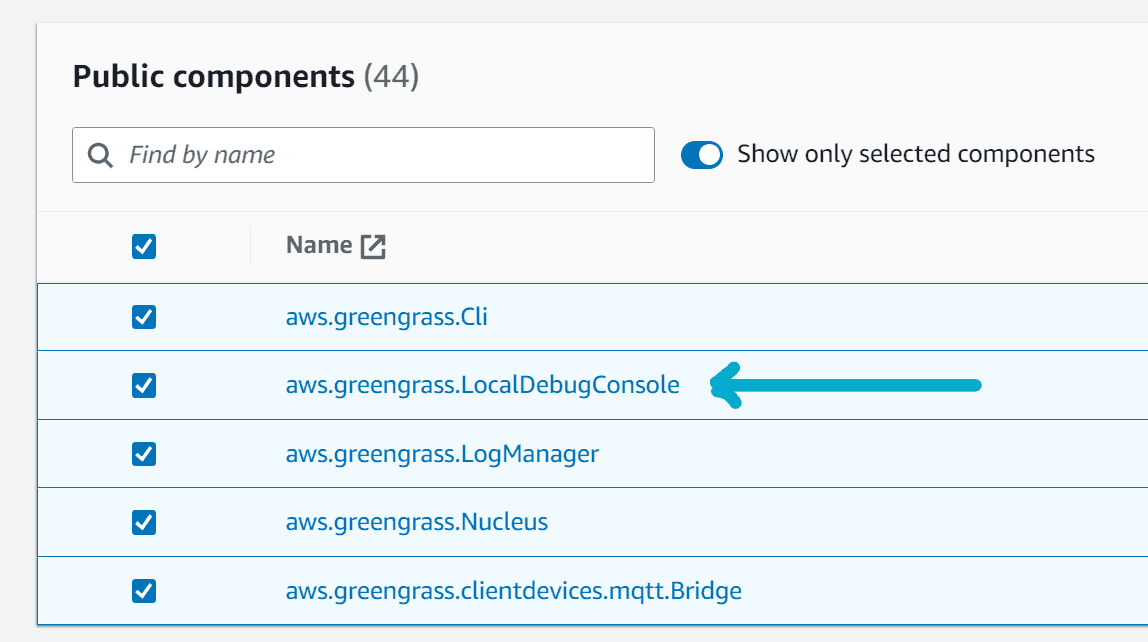
When developing Greengrass components, it is often useful to make modifications to deployments without needing to trigger a brand new deployment via the CLI or AWS Console. This is where the aws.greengrass.LocalDebugConsole component comes in handy.
To use the aws.greengrass.LocalDebugConsole component, you will need to add it to your Greengrass deployment. This can be done by creating the following block in a deployment file - In my case I've added it to the aws-greengrass-bricks/greengrass-observability/deployment.json.py
"aws.greengrass.LocalDebugConsole": {
    "componentVersion": "2.3.0",
    "runWith": {}
}
Alternative you can add it to your deployment via the AWS Console by revising your deployment and adding the aws.greengrass.LocalDebugConsole component.
Once the component has been added to your deployment, hopefully it will be deployed to your Greengrass device without drama. To connect to the local debug console we will need to perform two steps:
-
SSH into your Greengrass device with tunneling enabled. The command below will enable tunneling for ports 1441 and 1442. These ports will be available on your local machine at
localhost:1441andlocalhost:1442respectively.ssh -i <path-to-your-ssh-key> -L 1441:localhost:1441 -L 1442:localhost:1442 <username>@<ip-address>Note: You must keep the SSH session open in order to continue to be able to access the local debug console from your local machine. If you close the SSH session, you will need to re-run the command above.
-
Once connected to the Greengrass device, retrieve the debug password for the LocalDebugConsole component by running the following command:
sudo /greengrass/v2/bin/greengrass-cli get-debug-password
# Username: debug
# Password: O95f8XULvRlJ-xxxxxxxxxxxxxxxxxxxxxxxxxxxx
# Password expires at: 2023-06-24T22:51:26.541950941+08:00
Note: The password will expire over time. You will need to aquire a new password when it expires, or if you restart the component.
-
Open https://localhost:1441 in your browser, logging in with the credentials above.
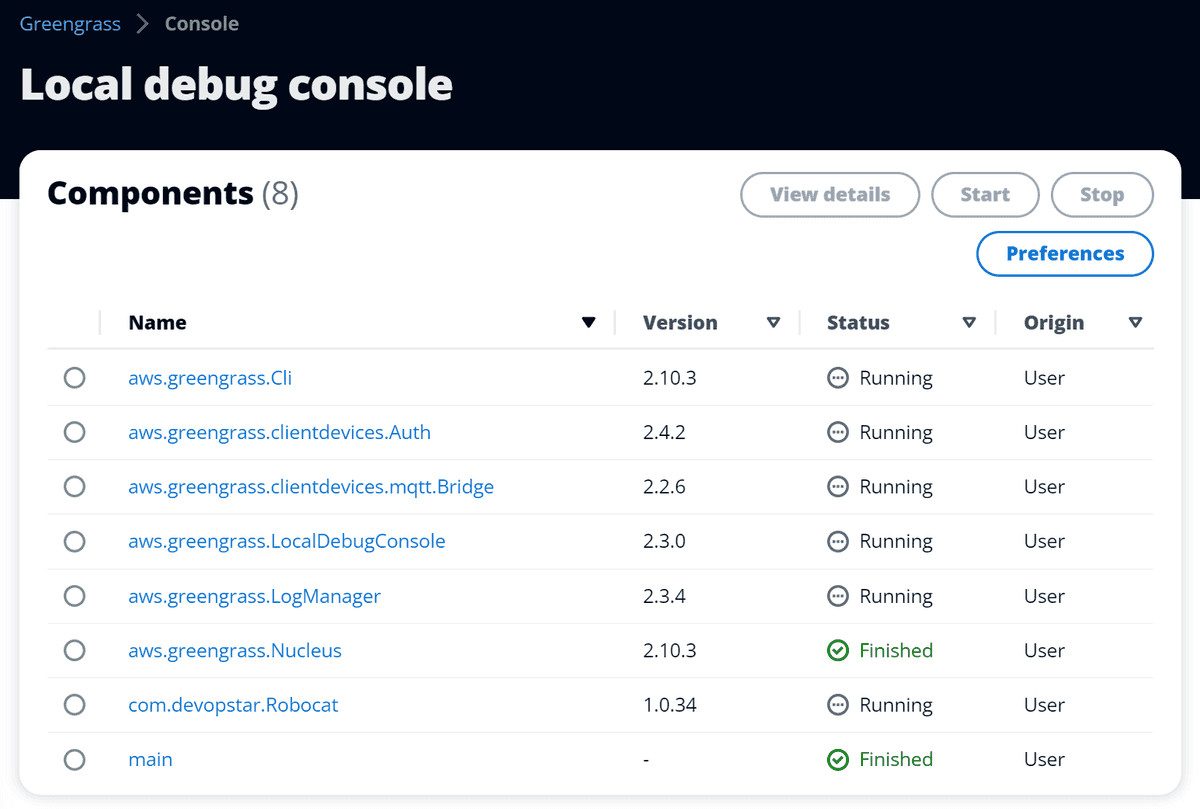
Local debug console

Take a look around the local debug console. You will notice any components you have deployed to your Greengrass device will be listed in the Components panel.
The main feature of the local debug console is the ability to modify the configuration of components on the fly. Lets demostrate this by clicking on our com.devopstar.Robocat component!
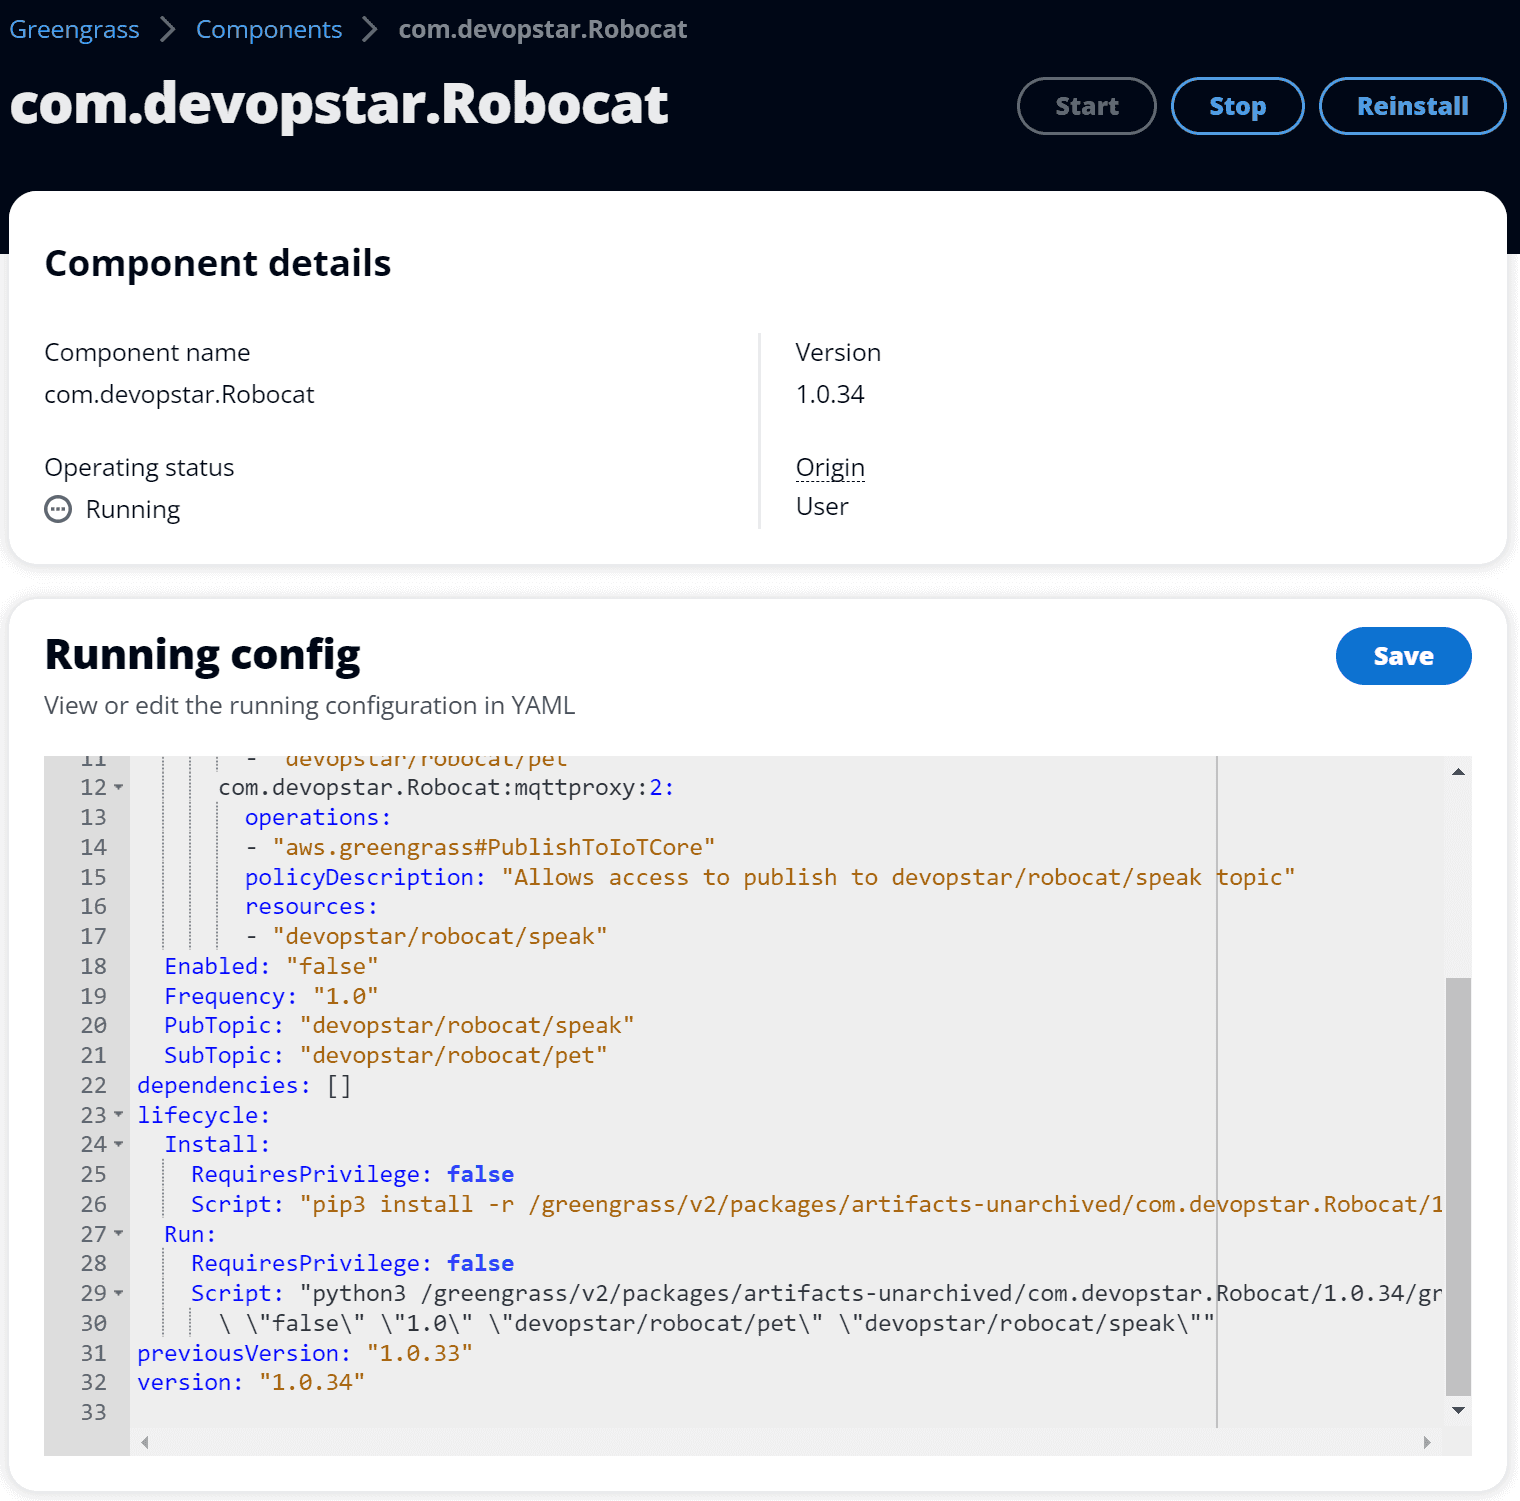
If you've been following along with my previous posts you might have noticed that I've modified the com.devopstar.Robocat component to have a few new configuration options
configuration:
...
  Enabled: "false"
  Frequency: "1.0"
  PubTopic: "devopstar/robocat/speak"
  SubTopic: "devopstar/robocat/pet"
...
    Script: "python3 /greengrass/v2/packages/artifacts-unarchived/com.devopstar.Robocat/1.0.34/greengrass-observability/src/robocat.py\
      \ \"false\" \"1.0\" \"devopstar/robocat/pet\" \"devopstar/robocat/speak\""
...
The Enabled configuration option tells the code whether or not to publish a stream of messages to a Pubsub topic named devopstar/robocat/speak. The Frequency configuration option tells the code how often to publish a message to the Pubsub topic. If you are curious about the code it can be found in the aws-greengrass-bricks/greengrass-observability/src/robocat.py.
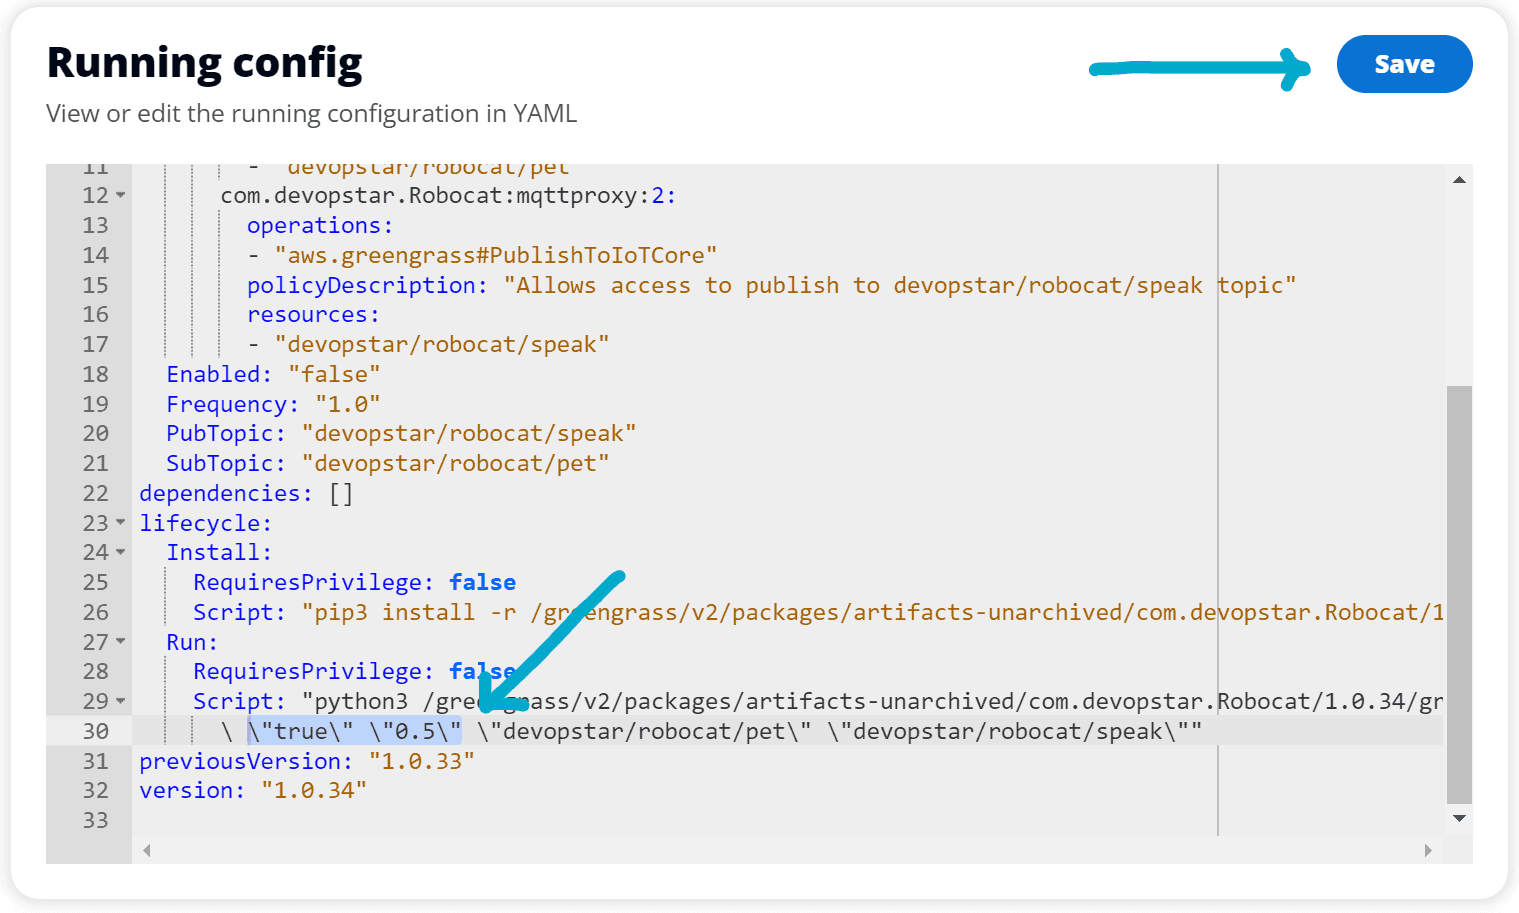
For the purpose of this demo, lets change the Enabled configuration option to true and the Frequency configuration option to 0.5. Once you've made the changes, click the Save button to apply the changes.
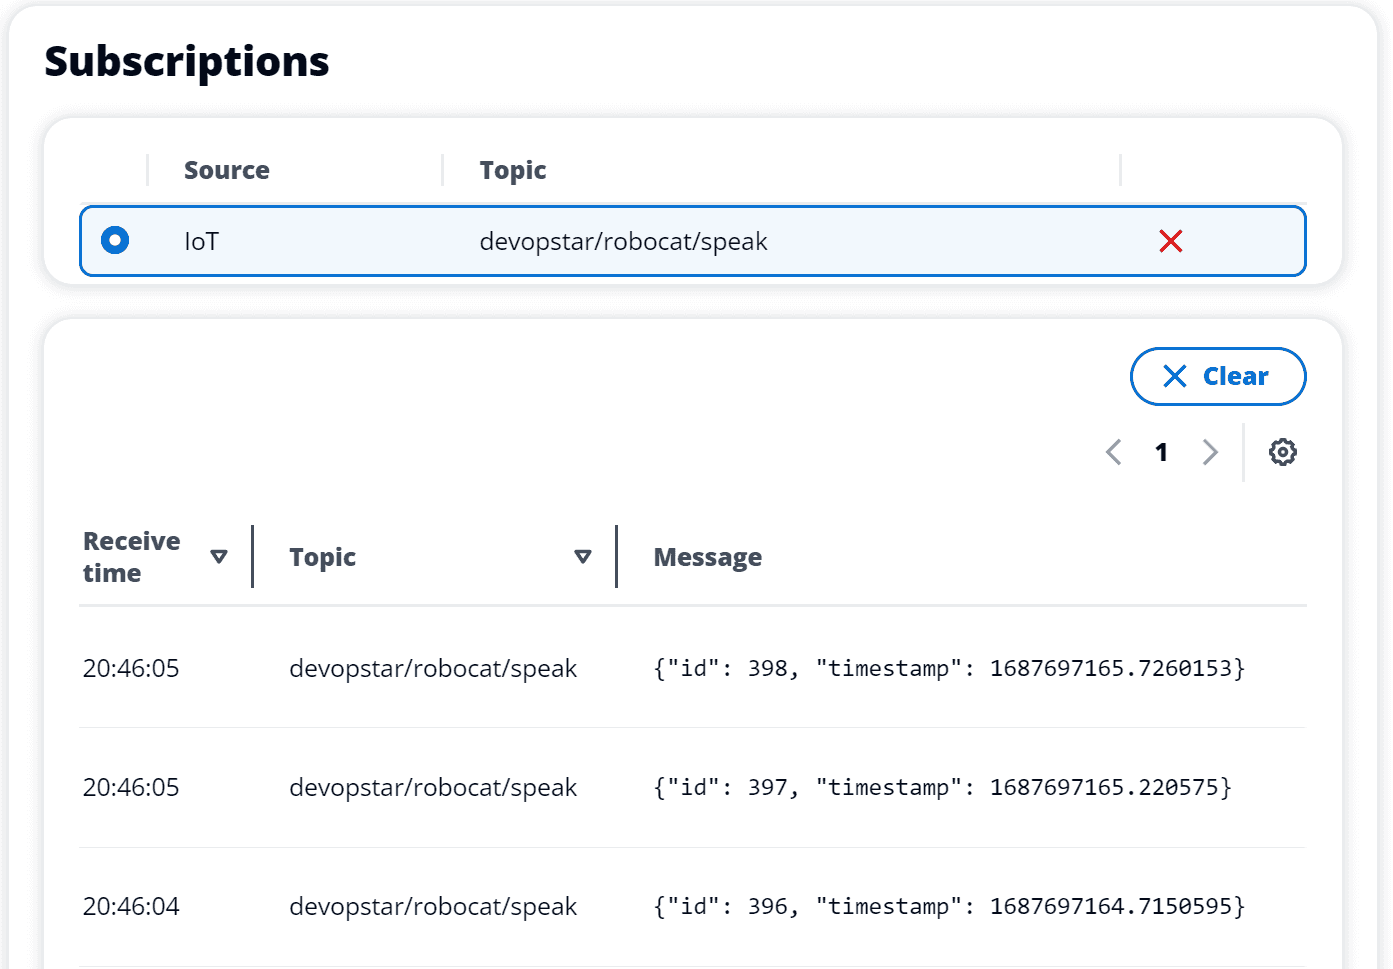
Now, to verify the component is publishing messages to the devopstar/robocat/speak topic, click the Messaging test client option on the left hand side of the local debug console.
Put the topic devopstar/robocat/speak into the Topic filter box and change the source to IoT Core. Then click the Subscribe button.
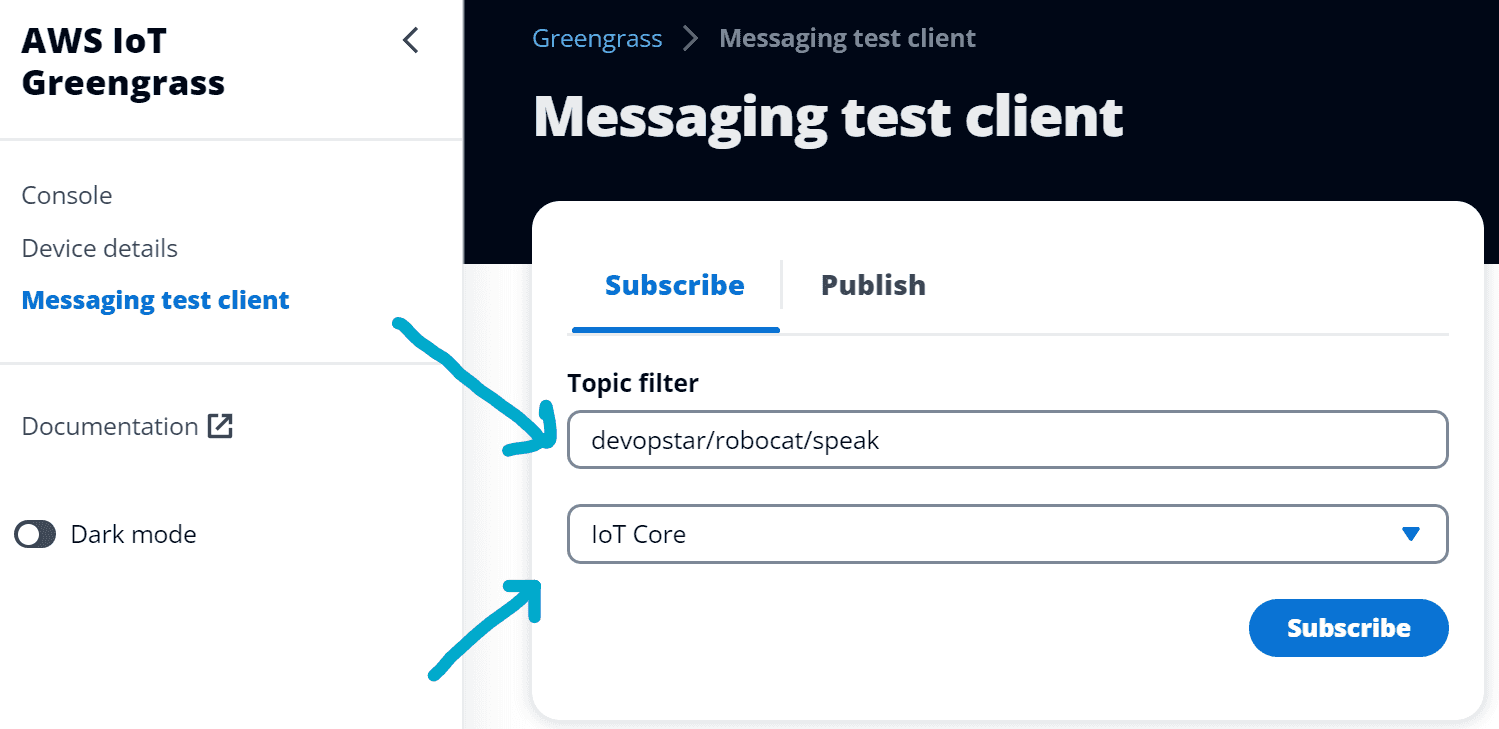
You should now see messages being published to the devopstar/robocat/speak topic.
aws.greengrass.LogManager
It's not always possible to connect to your Greengrass device via SSH, and when you have a device deployed in the field you don't want to have to connect to it to view the logs. The aws.greengrass.LogManager component can be used to ship logs from your Greengrass device to CloudWatch Logs. In this section we will explore how to configure the aws.greengrass.LogManager component, along with providing fine grained IAM permissions so that the Greengrass device can only ship logs to its own CloudWatch Logs log group.
Similarly to the aws.greengrass.LocalDebugConsole component, the aws.greengrass.LogManager component is not included in the default Greengrass deployment. You will need to add it to your deployment via the AWS Console by revising your deployment and adding the aws.greengrass.LogManager component. Alternatively, you can add it to your a deployment programmatically.
Take a look at the aws-greengrass-bricks/greengrass-observability/deployment.json.py file and you'll see how I've configured the aws.greengrass.LogManager component.
We'll break down the configuration below:
"aws.greengrass.LogManager": {
    "componentVersion": "2.3.4",
    "configurationUpdate": {
        "merge": json.dumps({
            "logsUploaderConfiguration": {
                "systemLogsConfiguration": {
                    "uploadToCloudWatch": "true",
                    "minimumLogLevel": "INFO",
                    "diskSpaceLimit": "10",
                    "diskSpaceLimitUnit": "MB",
                    "deleteLogFileAfterCloudUpload": "false"
                },
                "componentLogsConfigurationMap": {
                    "com.devopstar.Robocat": {
                        "minimumLogLevel": "INFO",
                        "diskSpaceLimit": "20",
                        "diskSpaceLimitUnit": "MB",
                        "deleteLogFileAfterCloudUpload": "true"
                    }
                }
            },
            "periodicUploadIntervalSec": 300
        })
    },
    "runWith": {}
},
There are two configuration levels that can be set for the component:
- System level (systemLogsConfiguration) - This configuration is primarily for Greengrass core (nucleus) and plugin components (code that runs in the same JVM as nucleus).
- Component level (componentLogsConfigurationMap) - This configuration is for components that we launch ourselves and want to ship logs for. This doesn't necessarily need to be a component that we've created, it could be a component that we've installed from Amazon's component library.
Both system and component level configurations have very similar options, but you might want to configure them differently. For example, you might want to delete the log files for your component after they've been uploaded to CloudWatch Logs, but you might not want to delete the log files for the system level logs as it might be useful to have them on the device for debugging purposes.
The periodicUploadIntervalSec configuration option tells the component how often to upload the logs to CloudWatch Logs. In this case we've set it to 300 seconds (5 minutes).
IAM Permissions
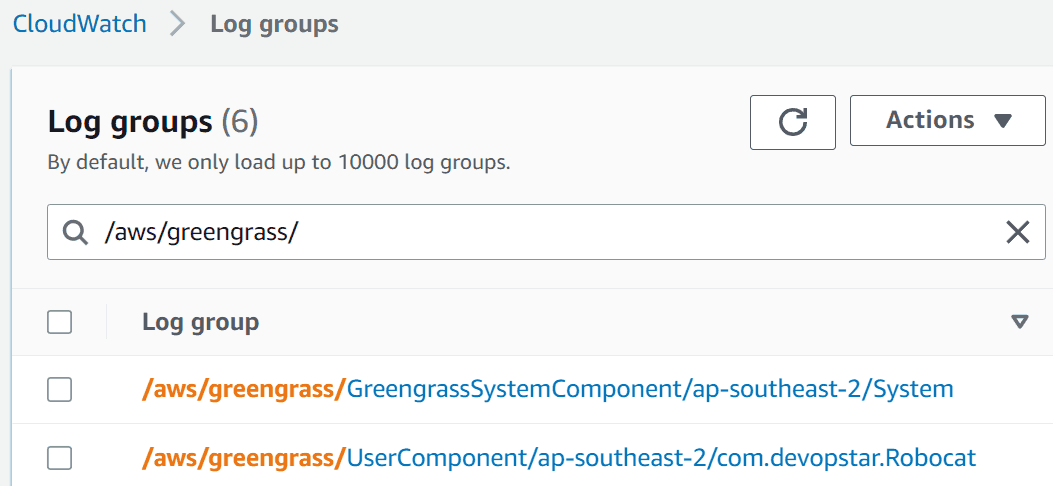
The aws.greengrass.LogManager component requires very specific IAM permissions to be able to ship logs to CloudWatch Logs. The format can be seen below:
# Log Group
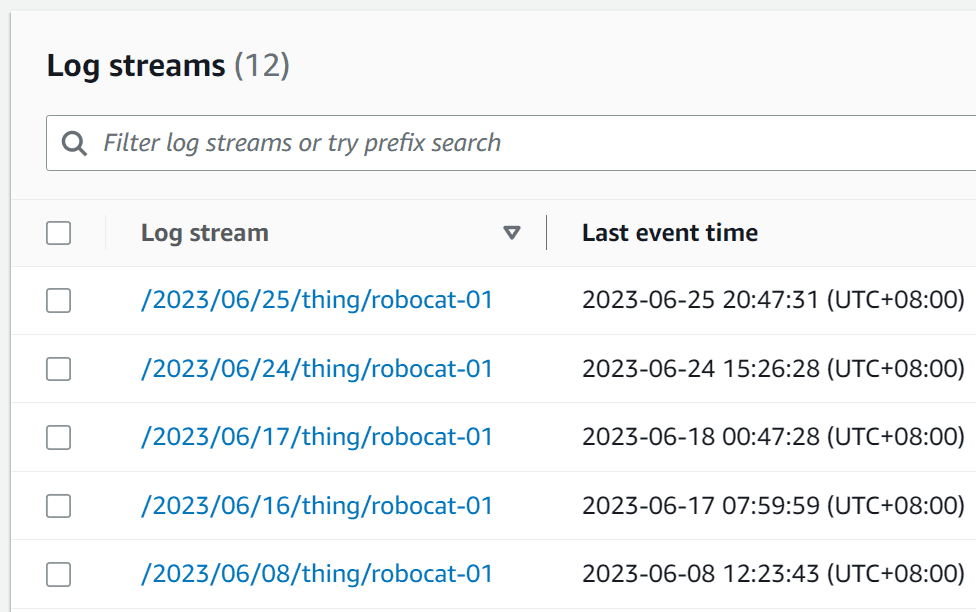
/aws/greengrass/<componentType>/<region>/<componentName>
# Log Stream
/<date>/thing/<thingName>- componentType - This can be either GreengrassSystemComponent or UserComponent.
- region - This is the region that the Greengrass device is deployed in.
- componentName - This is either the name of the component - or if it's a system component the value is System
- date - This is the date that the log was created in the format YYYY/MM/DD
- thingName - This is the name of the Greengrass device.
So, for example, if we have a Greengrass device called robocat in the ap-southeast-2 region, and we have a component called com.devopstar.Robocat, the IAM permissions would look like this:
{
  "Effect": "Allow",
  "Action": [
    "logs:CreateLogGroup",
    "logs:CreateLogStream",
    "logs:PutLogEvents",
    "logs:DescribeLogStreams"
  ],
  "Resource": [
    "arn:aws:logs:ap-southeast-2:01234567890:log-group:/aws/greengrass/GreengrassSystemComponent/ap-southeast-2/System:log-stream:*/thing/robocat",
    "arn:aws:logs:ap-southeast-2:01234567890:log-group:/aws/greengrass/UserComponent/ap-southeast-2/com.devopstar.Robocat:log-stream:*/thing/robocat"
  ]
}
This permission will also allow the Greengrass system components to ship logs to CloudWatch Logs for the robocat device.
Refer to the aws-greengrass-bricks/device-policy.json.template file to see the permissions I've used for this demo. The main difference is that I've used a wildcard for the componentName and thingName to make it easier to deploy to multiple devices in a Thing group.
Viewing the logs in CloudWatch Logs
When the aws.greengrass.LogManager component is deployed to your Greengrass device, you can start viewing logs in CloudWatch Logs.
Each of your components should have their own log group, and each log group should have a log stream for each day and each thing name that the component has been running on.
Note: There is currently no way to set a retention policy on the log groups that are created by the aws.greengrass.LogManager component. This means that you will need to manually delete the log groups if you want to remove them. You could also set a retention policy manually, however you will need to remember to do this for each log group that is created.
Conclusion
In this post we've taken a look at the aws.greengrass.LocalDebugConsole component and how it can be used to modify the configuration of components on the fly. We have also explored the aws.greengrass.LogManager component and learnt how it can be used to ship logs from your Greengrass device to CloudWatch Logs.
If you have any questions or comments, please feel free to reach out to me on Twitter or LinkedIn and let me know! I'm keen to hear about any other observability tools you might be using with Greengrass, or if there are component you think I should add to this guide.