Dog Bark Detector - Serverless Audio Processing


Table of Contents
- Dog Bark Detector - Machine Learning Model
- Dog Bark Detector - Serverless Audio Processing
- Dog Bark Detector - Frontend
I've always been curious as to what my pets get up to when I'm out of the house. This curiosity finally got the best of me this week and I decided to build I wanted to build a dog bark detection system in order to keep track of how often our two dogs bark.
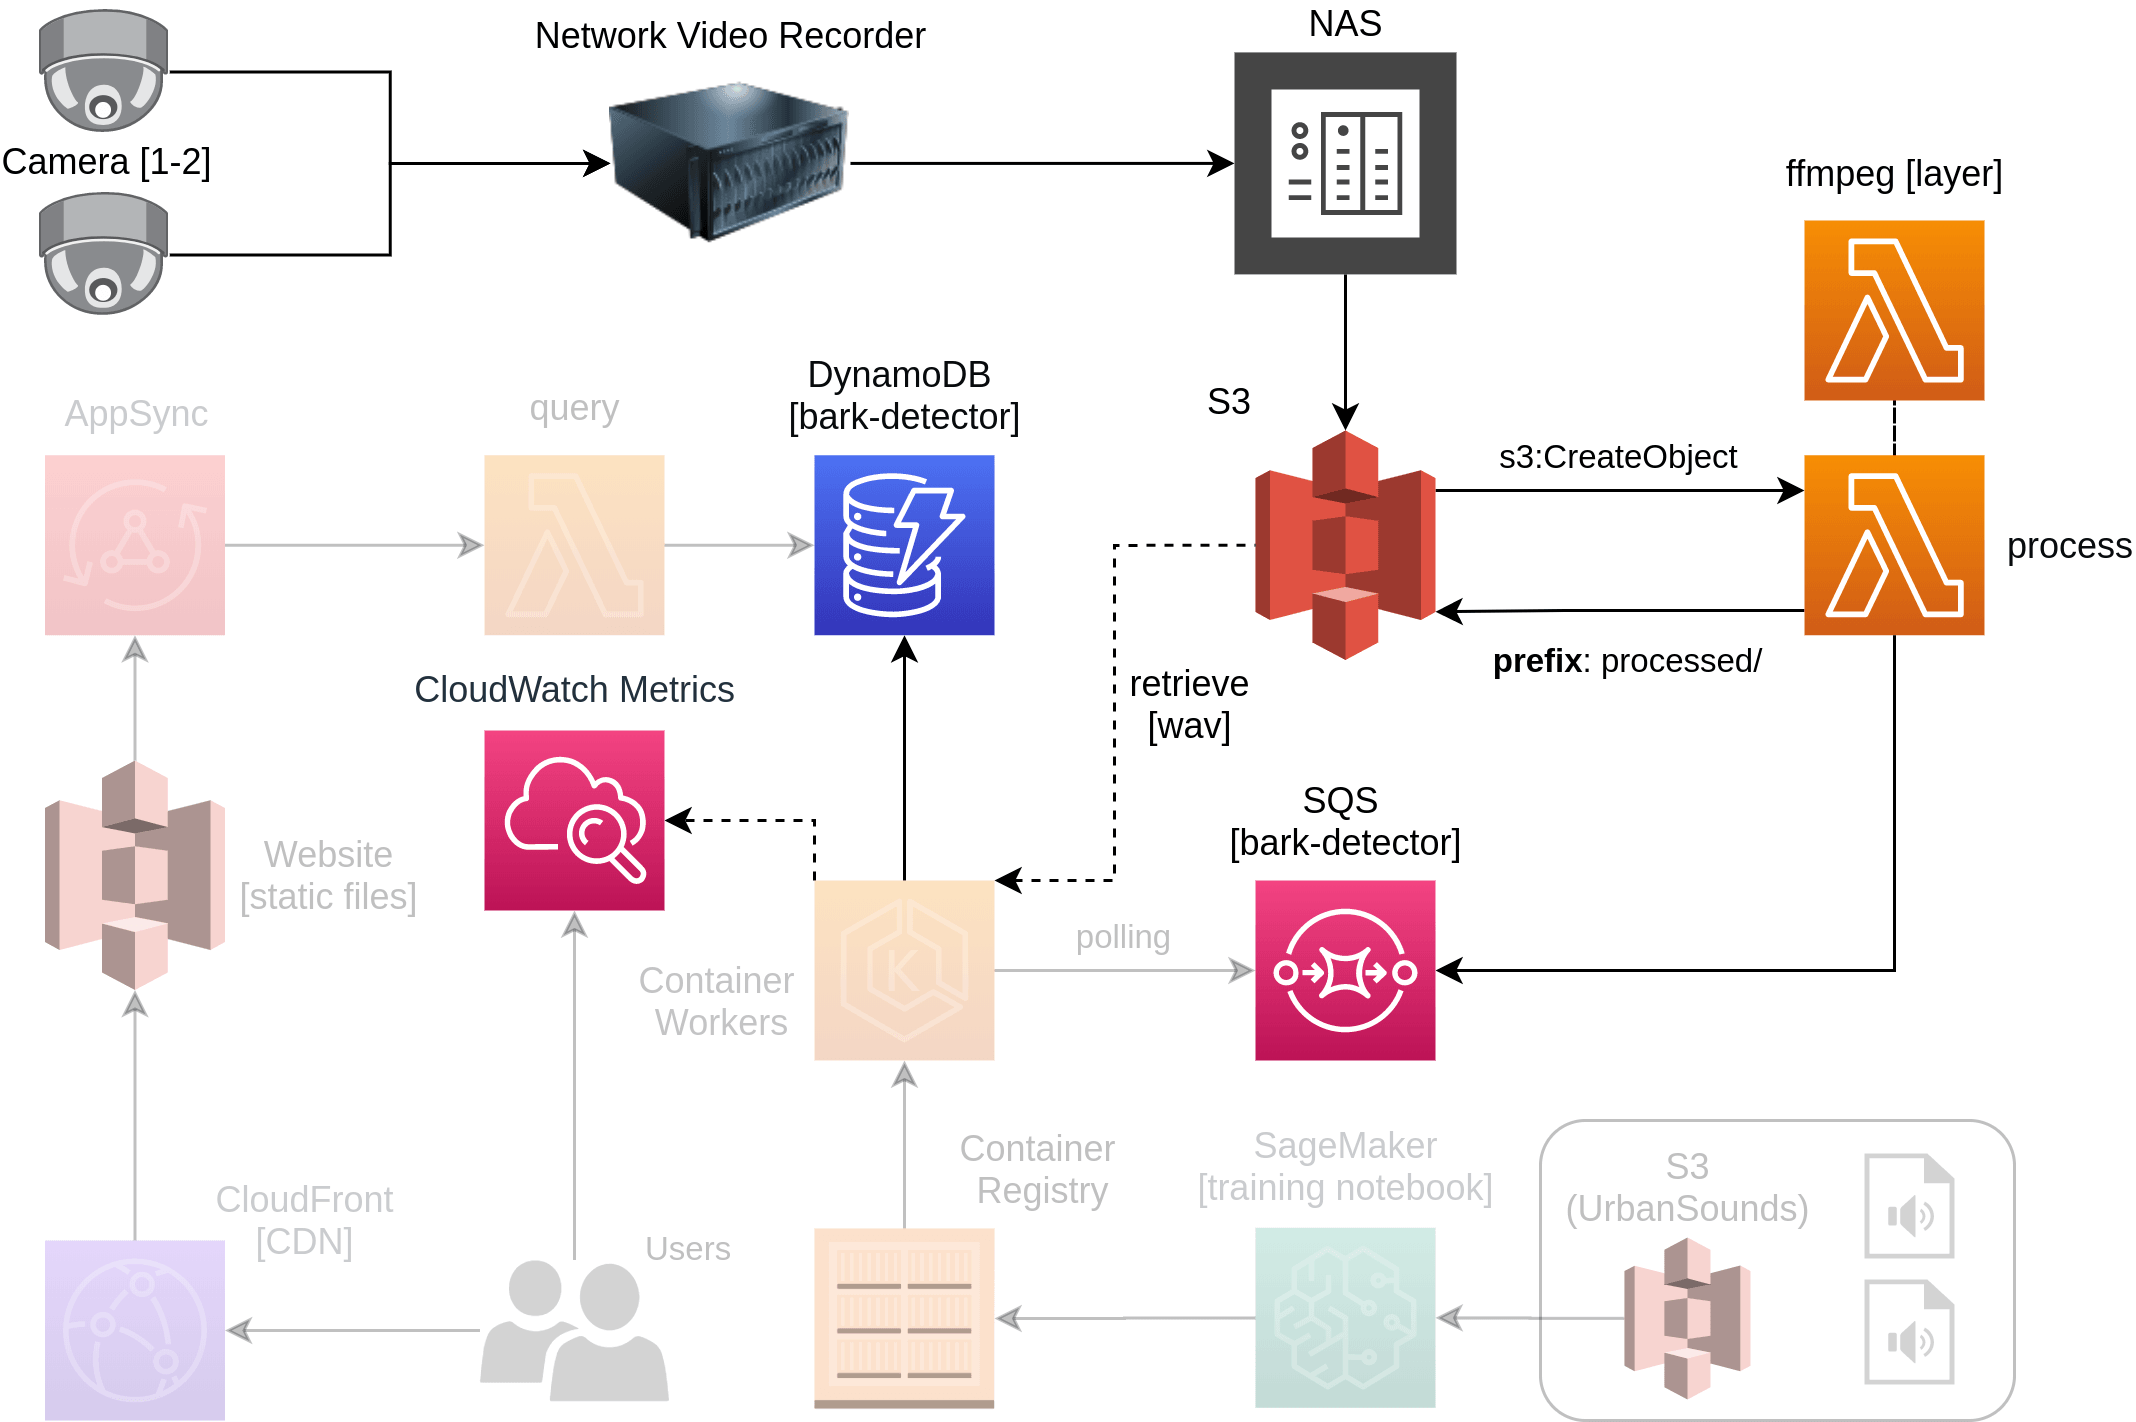
This guide covers the second of three guides around how the Dog Bark Detector was built; specifically focusing on the Serverless Audio Processing. You can see the components highlighted below that are core to this section of the guide.
It covers the following concepts at a high level along with providing all the source code and resources you will need to create your own version.
- FFMPEG Lambda Layer
- Serverless Video Ingestion using S3 events
- SQS Queue Feeding
- DynamoDB Data Storage
NOTE: For a look at the full implementation of this project, check out t04glovern/dog-bark-detection where this post specifically focuses on the
processorfolder.
Research
As always before we get started it is always a good idea to do some research on what kinds of projects already exist out there that save us writing something from scratch. In order to know what to search for however, we first must define what we want to achieve. Below are some general notes I took based on what was already created as part of the Machine Learning Model creation step:
- WAV files should be processed
- WAV files need to be in small clips (not long dragged out ones)
- Video/Audio timestamps need to be included to track when barks occur
- Video files will come from cameras / NAS
Using the information above I decided to look at ways to convert the 30 minute video clips that I get from my camera system into small bite sized chunks. In the past I've always used FFMPEG for these scenarios and actually wrote another blog post Serverless Watermark using AWS Lambda Layers & FFmpeg that does exactly what we are likely to what to do (except with Video to Audio).
FFMPEG Lambda Layer
Starting off lets get a simple Lambda project working with an FFMPEG layer. On top of my own post, I referred heavily to this one by Daniel Schep as well to bootstrap a simple Serverless project.
To start with I created a Serverless project. Serverless is a fantastic framework for orchestrating cloud resources with basic YAML
# Install Serverless framework
npm i -g serverless

# Create project
serverless create -t aws-python3 -n processor -p processor
cd processor
Add a new layer to the project by adding the following to the serverless.yml file
layers:
  ffmpeg:
    path: layer
Then create a folder and include the layer build
mkdir layer && cd layer
curl -O https://johnvansickle.com/ffmpeg/builds/ffmpeg-git-amd64-static.tar.xz
tar xf ffmpeg-git-amd64-static.tar.xz
rm ffmpeg-git-amd64-static.tar.xz
mv ffmpeg-git-*-amd64-static ffmpeg
cd ..
Now if we want to use the Lambda layer as part of a Lambda function, we can simply reference it in the Serverless yaml. Below is an example of how this reference looks like for our project.
functions:
  process:
    handler: handler.process
    layers:
      - {Ref: FfmpegLambdaLayer}
S3 Event Ingestion
One of the core services used for this project is Amazon S3 due to a neat little feature called S3 Events. When items are added to S3 you are able to fire off events to services like AWS Lambda which can capture and process this event for you. This particular feature comes in handy as our process flow looks like the following:
- NAS / Cameras uploads raw video file to S3
- S3 event fires sending a request to the Lambda function
- Lambda function uses FFMPEG to process the incoming video file
Take a look at how we define an S3 even in the serverless.yml file under functions.
functions:
  process:
    handler: handler.process
    events:
      - s3:
          bucket: ${self:custom.bucket}
          event: s3:ObjectCreated:*
          rules:
            - suffix: .mp4
    layers:
      - {Ref: FfmpegLambdaLayer}
Notice that we can define that the event should only fire when objects are created, and have the file extension .mp4. The code within our lambda function can be found in the t04glovern/dog-bark-detection repository under processor/handler.py. Note the bare minimum you would need to capture the file create event is the following:
def process(event, context):
    bucket_name = event['Records'][0]['s3']['bucket']['name']
    bucket_key = event['Records'][0]['s3']['object']['key']
SQS Queue Feeding
We are now at the point where we can flesh out the implementation details surrounding our video files splitting to wav files. I've split up this step into 4 distinct phases shown below.
To start with we must define some static variables which can be extracted from the file & folder names of the incoming video items. This information is things like timestamp, device ID and the size of the segments (audio clips) that we'd like to split.
file_name_split = bucket_key.rsplit('/')
file_name = file_name_split[2]
file_name_no_ext = file_name.rsplit('.')[0]
camera_name = file_name_split[0]
file_unix_timestamp = file_name_no_ext[-10:]
segment_time = '5'

custom_path = '{}.{}.{}'.format(camera_name, file_unix_timestamp, segment_time)
video_path = '/tmp/{}'.format(file_name)
audio_path = '/tmp/{}'.format(custom_path)

# Create the tmp directory
os.system('mkdir {}'.format(audio_path))
Next we are able to move onto downloading the source video file that will need to be split
try:
    # Download video file to tmp location in lambda
    s3_client.download_file(bucket_name, bucket_key, video_path)
except Exception as e:
    print('Error downloading s3://{}/{} : {}'.format(bucket_name, bucket_key, e))
    raise e
Then the video file is extracted out using the ffmpeg command with some filters such as segment & -segment_time
try:
    # Convert video into audio segments of 5 seconds
    os.system('/opt/ffmpeg/ffmpeg -i {} -f segment -segment_time {} {}/%d.wav'.format(video_path, segment_time, audio_path))
    os.system('rm {}'.format(video_path))
except Exception as e:
    print('Error converting video {} : {}'.format(video_path, e))
    raise e
The fragments are now converted into 5 second chunks, so they need to be re-uploaded to S3 for use when performing inference in the Machine learning step.
try:
    # Write fragments to S3
    processed_path = 'processed/{}'.format(custom_path)
    num_items = upload_objects(audio_path, bucket_name, processed_path)
    os.system('rm -rf {}'.format(audio_path))
except Exception as e:
    print('Error uploading to s3 {} : {}'.format(audio_path, e))
    raise e
The final step is to send an Amazon SQS message containing all the information about the video file task that needs to be processed.
try:
    # Construct message
    message = {
        'camera': camera_name,
        'bucket_name': bucket_name,
        'bucket_path': processed_path,
        'num_items': num_items,
        'segment_length': segment_time,
        'timestamp': file_unix_timestamp
    }
    # Enqueue signal to process
    response = sqs_client.send_message(QueueUrl=queue_url, MessageBody=json.dumps(message))
    return {
        'message': response
    }
except Exception as e:
    print('Error queuing : {}'.format(e))
    raise e
Deploying Resources
We will also need to define a couple resources to be created such as the SQS queue and DynamoDB table. Luckily we're able to do this right inside the same serverless.yml file we've been working with so far. In a resources block near the end of the file you can see I've defined a queue and a table like so
resources:
  Resources:
    BarkDetectorQueue:
      Type: AWS::SQS::Queue
      Properties:
        QueueName: ${self:custom.queue}
    BarkDetectorDynamo:
      Type: AWS::DynamoDB::Table
      Properties:
        TableName: ${self:custom.table}
        AttributeDefinitions:
          - AttributeName: deviceId
            AttributeType: S
          - AttributeName: timestamp
            AttributeType: N
        KeySchema:
          - AttributeName: deviceId
            KeyType: HASH
          - AttributeName: timestamp
            KeyType: RANGE
        BillingMode: PAY_PER_REQUEST
Likewise our IAM (permissions and roles) can also be defined under the provider block. Notice that I've defined read/write access to an S3 bucket; this is the same bucket we're catching S3 events from and basically allows us to pull the video files and write the processed WAV files back.
provider:
...
  iamRoleStatements:
    - Effect: Allow
      Action:
        - s3:PutObject
        - s3:GetObject
        - s3:DeleteObject
      Resource: "arn:aws:s3:::${self:custom.bucket}/*"
    - Effect: Allow
      Action:
        - sqs:GetQueueUrl
        - sqs:SendMessage
      Resource: "*"
  environment:
QUEUE_NAME: ${self:custom.queue}NOTE: Refer to the completed
serverless.ymlfile in the repository before deploying as it contains some other minor changes
We should now be ready to deploy the Lambda function using the serverless commands shown below:
serverless deployAnd that is more or less it on the Serverless processing side! We've can now move onto the next step in processing we're going to cover which is receiving SQS items and posting results to DynamoDB & CloudWatch Metrics
DynamoDB & CloudWatch Metrics
With the events ships to SQS, the code we wrote in part one of this tutorial Dog Bark Detector - Machine Learning Model takes over and performs inference on each WAV file from S3.
Jumping back over to the Machine learning inference code we can start to break down how incoming messages are processed and forwarded onto DynamoDB & CloudWatch Metrics
Each message is first extracted from a batch of SQS items and split into variables for ease of use.
# Process each message
for message in messages:
    try:
        try:
            body = json.loads(message['Body'])
            print(body)
            camera = body['camera']
            bucket = body['bucket_name']
            bucket_path = body['bucket_path']
            num_items = int(body['num_items'])
            segment_length = int(body['segment_length'])
            timestamp = int(body['timestamp'])
        except Exception as e:
            print()
            print('ERROR: Parsing message')
            print(e)
            raise e
Then each WAV file is downloaded from S3 and processed using the prediction algorithm we wrote in the first post.
for i in range(num_items):
    try:
        wav_file_key = '{}/{}.wav'.format(bucket_path, i)
        audio_data, sample_rate = download_wav_data(bucket, wav_file_key)
        prediction = return_prediction(audio_data, sample_rate)
        prediction['timestamp'] = timestamp + (i * segment_length)
If an item is defined as a dog bark and also has a probability of higher then 75% then an entry is added to DynamoDB and CloudWatch Metrics
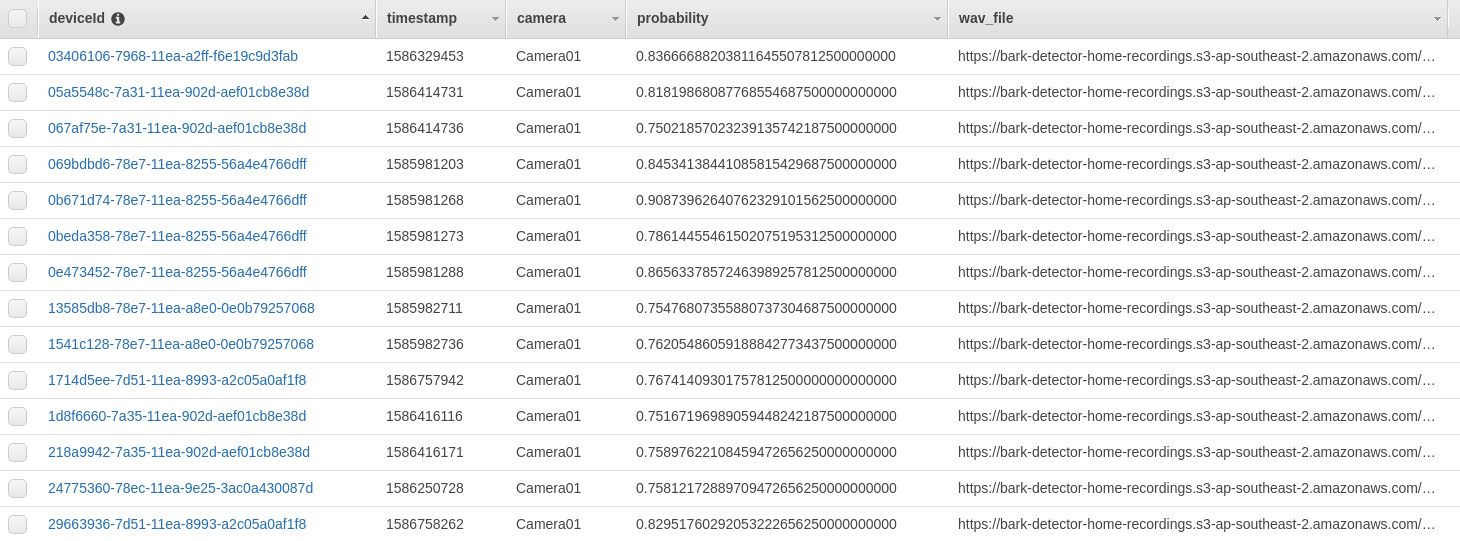
if prediction['class'] == 'dog_bark' and prediction['probabilities']['dog_bark'] > 0.75:
try:
table.put_item(
Item={
'deviceId': str(uuid.uuid1()),
'camera': camera,
'timestamp': prediction['timestamp'],
'probability': format(prediction['probabilities']['dog_bark'], '.32f'),
'wav_file': 'https://{}.s3-{}.amazonaws.com/{}'.format(bucket, region, wav_file_key)
}
)
except Exception as e:
print('ERROR: Inserting in DynamoDB')
print(e)
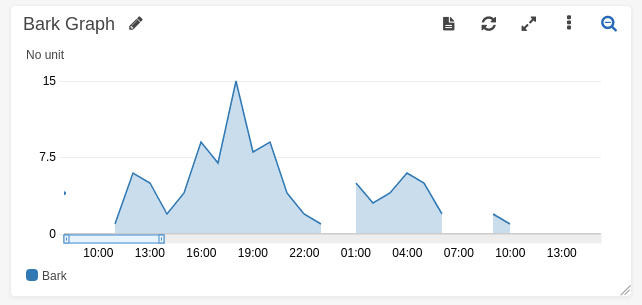
# Put metric in CloudWatch
put_bark_metric(
camera,
prediction['timestamp'],
format(prediction['probabilities']['dog_bark'], '.32f')
)Now if we start ingesting video files we should begin to see entries come through to DynamoDB
NOTE: The reason for CloudWatch Metrics is so we're able to easily graph trends over time without having to write any time series logic. This is particularly handy when prototyping.
Conclusion
This concludes the second part of this guide where we've achieved our goal of creating the backend for our Dog Bark detector. We've implemented an FFMPEG Lambda layer using Serverless framework; along with creating a DynamoDB instance and SQS queues for processing WAV clips. If you enjoyed this guide and would like to continue along building out this solution, check out the next guides in the series:
If you have any questions or want to show off how you might have tweaked this project; please hit me up on Twitter @nathangloverAUS