Greengrass - Secure Tunneling

Table of Contents
- Greengrass Device Setup
- Connectors - Docker
- Device Defender - Detect
- IoT - Secure Tunneling
Introduction
AWS IoT Secure Tunneling is a managed proxy meant for devices positioned behind secure firewalls on remote sites. A secure tunnel can be created using temporary credentials allowing access to the device on configurable ports. The secure tunneling process requires a bidirectional link to be established before communication can proceed.
This post aims to demystifying the setup and management process of AWS IoT Secure Tunneling by demonstrating an end to end example.
How it works
I found that the documentation on this topic was a little lacking so I created the following diagram with annotations.
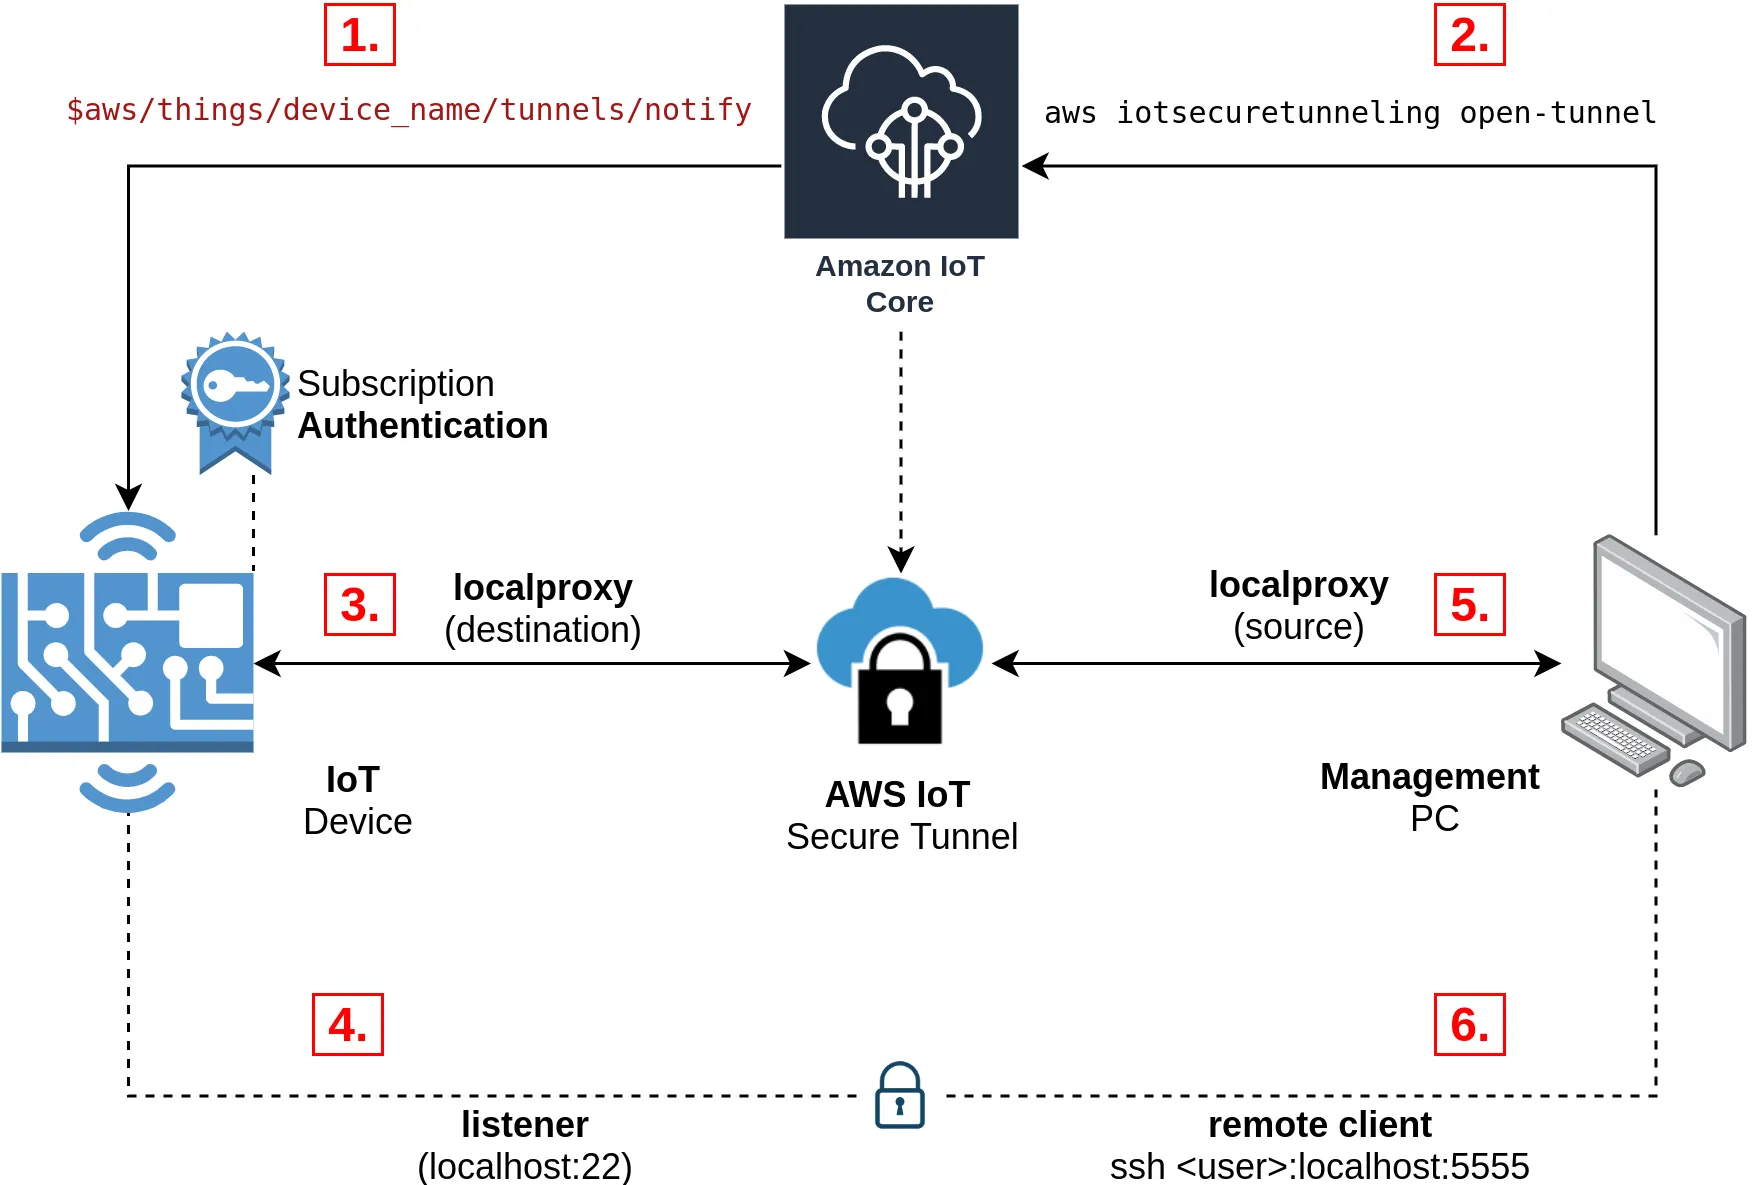
- 1. Device uses x509 certificates with specific permissions to subscribe to the amazon managed
tunnels/notifytopic. - 2. Tunnel is opened either using the GUI or CLI. device name defined to target specific device.
- Device receives destination access token from its subscription to the
tunnels/notifytopic
- Device receives destination access token from its subscription to the
- 3. localproxy runs in destination mode using the access token it received from the topic.
- At this point half (left side) of the secure tunnel is up and running
- 4. Listener for the destination tunnel also starts up. In this example we are exposing port 22 for SSH.
- Note that any port / service could be exposed
- 5. localproxy runs in source mode using the access token generated when the tunnel was created in step 2.
- At this point both sides of the secure tunnel are up and running.
- 6. Client can now open a connection on the defined port (in this example we used port 5555) and it will be tunnelled through to the IoT device.
Now that you have an idea how this process works, let’s go through and implement a simple SSH tunnel to a Raspberry Pi.
Prerequisites
It would help tremendously if you have either setup or done the following:
- AWS CLI installed and setup
- Briefly skimmed the AWS IoT Secure Tunneling documentation
- Have completed the device setup post: Greengrass - Greengrass Device Setup
- If not this, then at-least know how to create AWS IoT certificates with a policy
iot*
- If not this, then at-least know how to create AWS IoT certificates with a policy
Build localproxy
As usual we will be tackling this problem from the Raspberry Pi 3B+ (armv7l) perspective. I am actually shooting myself in the foot on purpose however, as the documentation for this process is extremely lacking currently.
Currently there are no mirriors of localproxy so you’ll either have to:
- Build it yourself
- Use my pre-compiled mirrors
Ubuntu (x86_64)
The documentation for this compile should work however to save you sometime I’ve bundled the binaries and can be downloaded and installed from the following.
# Download binaries
wget https://github.com/t04glovern/aws-greener-grass/raw/master/.blog/greengrass-secure-tunnel/binaries/localproxy-x86_64 -O localproxy
wget https://github.com/t04glovern/aws-greener-grass/raw/master/.blog/greengrass-secure-tunnel/binaries/localproxytest-x86_64 -O localproxytest

# Copy binaries
sudo mv localproxy /usr/bin/localproxy
sudo mv localproxytest /usr/bin/localproxytest
Raspberry Pi (armv7l)
Instructions for the Raspberry Pi (arm7l) compile can also be found in the aws-iot-securetunneling-localproxy repository. Before jumping into how to compile however, you can optionally jump in and use the binaries below.
# Download binaries
wget https://github.com/t04glovern/aws-greener-grass/raw/master/.blog/greengrass-secure-tunnel/binaries/localproxy-armv7l -O localproxy
wget https://github.com/t04glovern/aws-greener-grass/raw/master/.blog/greengrass-secure-tunnel/binaries/localproxytest-armv7l -O localproxytest

# Copy binaries
sudo mv localproxy /usr/bin/localproxy
sudo mv localproxytest /usr/bin/localproxytest
Install pre-requirements
sudo apt-get install cmake git
Install pre-compiled localproxy
# Zlib dependency
cd ~
wget https://www.zlib.net/zlib-1.2.11.tar.gz -O /tmp/zlib-1.2.11.tar.gz
tar xzvf /tmp/zlib-1.2.11.tar.gz
cd zlib-1.2.11
./configure
make
sudo make install

# Boost dependency
cd ~
wget https://dl.bintray.com/boostorg/release/1.69.0/source/boost_1_69_0.tar.gz -O /tmp/boost.tar.gz
tar xzvf /tmp/boost.tar.gz
cd boost_1_69_0
./bootstrap.sh
sudo ./b2 install

# Protobuf dependency
cd ~
wget https://github.com/protocolbuffers/protobuf/releases/download/v3.11.2/protobuf-all-3.11.2.tar.gz -O /tmp/protobuf-all-3.11.2.tar.gz
tar xzvf /tmp/protobuf-all-3.11.2.tar.gz
cd protobuf-3.11.2
mkdir build
cd build
cmake ../cmake
make
sudo make install

# OpenSSL development libraries
sudo apt install libssl-dev

# Catch2 test framework
cd ~
git clone https://github.com/catchorg/Catch2.git
cd Catch2
mkdir build
cd build
cmake ../
make
sudo make install

# localproxy build
cd ~
git clone https://github.com/aws-samples/aws-iot-securetunneling-localproxy
cd aws-iot-securetunneling-localproxy
mkdir build
cd build
cmake ../ -DCMAKE_CXX_FLAGS=-latomic
make

# Install binary
sudo cp bin/* /bin/
localproxy Test
Now that the localproxy binary is installed you can run the pre-flight tests by running the following
localproxytest
# Test server is listening on address: 127.0.0.1 and port: 39985
# [2019-12-23 11:52:10.957851] [0x7616b3a0] [info]    Starting proxy in source mode
# [2019-12-23 11:52:10.972793] [0x7616b3a0] [trace]   Setting up web socket...
# [2019-12-23 11:52:10.973425] [0x7616b3a0] [info]    Attempting to establish web socket connection with endpoint wss://127.0.0.1:39985
# [2019-12-23 11:52:11.425299] [0x7696c3a0] [info]    Disconnected from: 127.0.0.1:34989
# ...
# ...
# ...
# [2019-12-23 11:52:11.425688] [0x7696c3a0] [trace]   Both socket drains complete. Setting up TCP socket again
# ===============================================================================
# All tests passed (32 assertions in 2 test cases)
secure_tunnel Install
For a tunnel connection to be setup for us, we must create an IoT listener that triggers localproxy for us on request. For this I’ve written a simple block of code that an be found below.
#!/usr/bin/python3

import argparse
import boto3
import botocore.exceptions
import logging
import json
import random
import string
import subprocess
import time

from AWSIoTPythonSDK.MQTTLib import AWSIoTMQTTClient


parser = argparse.ArgumentParser()
parser.add_argument("-a", "--rootCA",   action="store", dest="rootCAPath", default="/greengrass/certs/AmazonRootCA1.pem", help="Root CA file path")
parser.add_argument("-c", "--cert",     action="store", dest="certificatePath", default="/greengrass/certs/device.cert.pem", help="Certificate file path")
parser.add_argument("-k", "--key",      action="store", dest="privateKeyPath", default="/greengrass/certs/device.private.key", help="Private key file path")
parser.add_argument("-t", "--topic",    action="store", required=True, dest="topic", help="Topic to subscribe to")
parser.add_argument("-r", "--region",   action="store", dest="region", default="us-east-1", help="AWS region")
parser.add_argument("-e", "--endpoint", action="store", dest="endpoint", help="AWS IoT Endpoint")

# Parse Arguments
args = parser.parse_args()
rootCAPath = args.rootCAPath
certificatePath = args.certificatePath
privateKeyPath = args.privateKeyPath
topic = args.topic
region = args.region


def random_client_id(size=6, chars=string.ascii_uppercase + string.digits):
    return ''.join(random.choice(chars) for x in range(size))


def tunnel_callback(client, userdata, message):
    json_message = json.loads(message.payload.decode('utf-8'))
    if message.topic == topic:
        subprocess.run([
            "localproxy",
            "-t", json_message['clientAccessToken'],
            "-r", region,
            "-d", "localhost:22"
        ])


# Configure logging
logger = logging.getLogger("AWSIoTPythonSDK.core")
logger.setLevel(logging.DEBUG)
streamHandler = logging.StreamHandler()
formatter = logging.Formatter('%(asctime)s - %(name)s - %(levelname)s - %(message)s')
streamHandler.setFormatter(formatter)
logger.addHandler(streamHandler)

# Init IoT Client
if args.endpoint:
    endpoint = args.endpoint
else:
    try:
        iot_client = boto3.client('iot', region_name=region)
        iot_endpoint_response = iot_client.describe_endpoint(endpointType='iot:Data-ATS')
        endpoint = iot_endpoint_response['endpointAddress']
    except botocore.exceptions.NoCredentialsError as e:
        print('Boto3 could not authenticate IoT call: {}'.format(e))

# Init AWSIoTMQTTClient
aws_iot_mqtt_client = None
aws_iot_mqtt_client = AWSIoTMQTTClient(random_client_id())
aws_iot_mqtt_client.configureEndpoint(endpoint, 443)
aws_iot_mqtt_client.configureCredentials(rootCAPath, privateKeyPath, certificatePath)

# Connect and subscribe to AWS IoT
aws_iot_mqtt_client.connect()
aws_iot_mqtt_client.subscribe(topic, 1, tunnel_callback)

while True:
    time.sleep(1)
Make a copy of the code above into a location on your device. I recommend in /usr/bin
# Paste contents above in here
sudo nano /usr/bin/secure_tunnel

# Change permissions
sudo chmod +x /usr/bin/secure_tunnel
Next step is to install the requirements required for this script to run. If you have pip3 installed (specifically python3 pip) you can install the two requirements yourself with the following.
sudo pip3 install AWSIoTPythonSDK
sudo pip3 install boto3
secure_tunnel Arguments
Check the requirements for the secure_tunnel cli by running:
secure_tunnel -h
# usage: secure_tunnel [-h] [-a ROOTCAPATH] [-c CERTIFICATEPATH]
#                      [-k PRIVATEKEYPATH] -t TOPIC [-r REGION] [-e ENDPOINT]

# optional arguments:
#   -h, --help            show this help message and exit
#   -a ROOTCAPATH, --rootCA ROOTCAPATH
#                         Root CA file path
#   -c CERTIFICATEPATH, --cert CERTIFICATEPATH
#                         Certificate file path
#   -k PRIVATEKEYPATH, --key PRIVATEKEYPATH
#                         Private key file path
#   -t TOPIC, --topic TOPIC
#                         Topic to subscribe to
#   -r REGION, --region REGION
#                         AWS region
#   -e ENDPOINT, --endpoint ENDPOINT
#                         AWS IoT Endpoint
Most of the arguments above I’ll explain later, however for the certificates you should be able to run the script using the certificates we installed at in the first set of tutorials. These are found in the /greengrass/certs folder.
Find the names of these by running the following:
ls -al /greengrass/certs
# drwxr-xr-x 2  501 staff 4096 Dec 12 12:43 .
# drwxr-xr-x 6 root root  4096 Nov 25 21:52 ..
# -rw-r--r-- 1  501 staff 1674 Dec 12 12:43 efa556d93df7d7b53674b3e40496a8994700702b90077ff7e24efa07812f21c9.key
# -rw-r--r-- 1  501 staff 1219 Dec 12 12:43 efa556d93df7d7b53674b3e40496a8994700702b90077ff7e24efa07812f21c9.pem
# -rw-r--r-- 1 root root    45 Nov 25 21:52 README
# -rw-r--r-- 1  501 staff 1188 Apr 12  2019 root.ca.pem
In my case I can use the following:
secure_tunnel \
    -a "/greengrass/certs/root.ca.pem" \
    -c "/greengrass/certs/efa556d93df7d7b53674b3e40496a8994700702b90077ff7e24efa07812f21c9.pem" \
    -k "/greengrass/certs/efa556d93df7d7b53674b3e40496a8994700702b90077ff7e24efa07812f21c9.key" \
    -t "TODO" \
    -r "TODO" \
    -e "TODO"
The final parts of the command can be found below:
- topic (-t) - Based on the documentation the topic should be in the following format
$aws/things/thing_name/tunnels/notify. Note: make sure to string escape the $.
- region (-r) - Should match your deployed IoT region.
- In my case
us-east-1.
- In my case
- endpoint (-e) - IoT Endpoint can be found in the settings section of the AWS IoT portal. Alternatively it can be obtained through the CLI using the following command:
aws iot describe-endpoint --endpoint-type iot:Data-ATS
So for my example, the final command would be:
secure_tunnel \
    -a "/greengrass/certs/root.ca.pem" \
    -c "/greengrass/certs/efa556d93df7d7b53674b3e40496a8994700702b90077ff7e24efa07812f21c9.pem" \
    -k "/greengrass/certs/efa556d93df7d7b53674b3e40496a8994700702b90077ff7e24efa07812f21c9.key" \
    -t "\$aws/things/lila/tunnels/notify" \
    -r "us-east-1" \
    -e "xxxxxxxxxxxxx-ats.iot.us-east-1.amazonaws.com"
secure_tunnel Run
Run the secure_tunnel command with your arguments in preparation for the next steps. When you run secure_tunnel it will monitor the $aws/things/thing_name/tunnels/notify topic for a particular message. This message comes in the following format:
{
    "clientAccessToken": "destination-client-access-token",
    "clientMode": "destination",
    "region": "aws-region",
    "services": ["destination-service"]
}
To create this message, an AWS IoT Secure Tunnel needs to be created; either through the GUI or the CLI.
Secure Tunnel Create [GUI]
Navigate to the AWS IoT location to create a new Secure Tunnel.
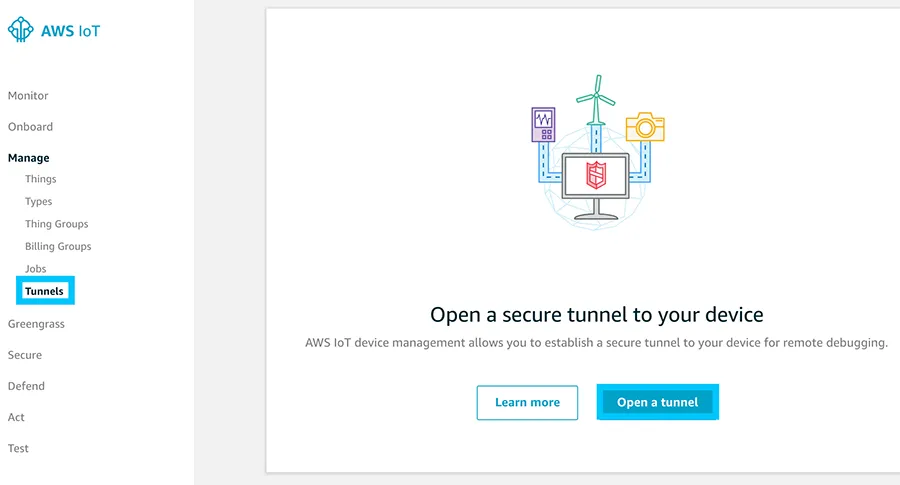
AWS IoT Secure Tunnel Create
Provide details similar to the following:
- Select your device
- In my case it’s
lila
- In my case it’s
- List the services
- technically you don’t need to provide anything here. The idea being that you could toggle between different types of services based on a check in this field.
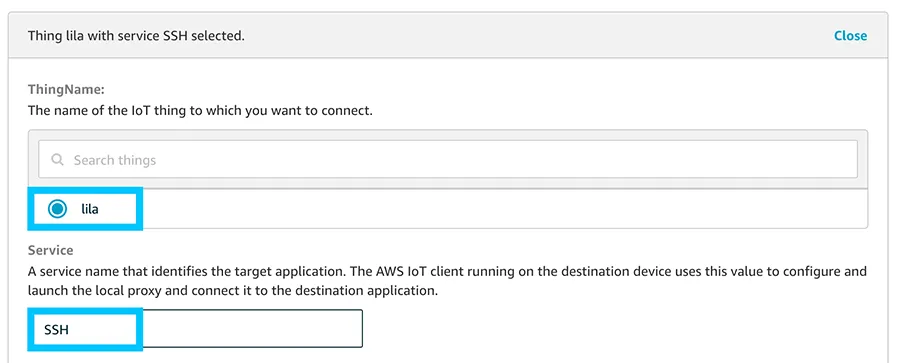
AWS IoT Secure Tunnel Settings
There is also an option to specify a timeout on the credentials. I recommend keeping this low so that if your tokens get leaked somehow, they will naturally expire.
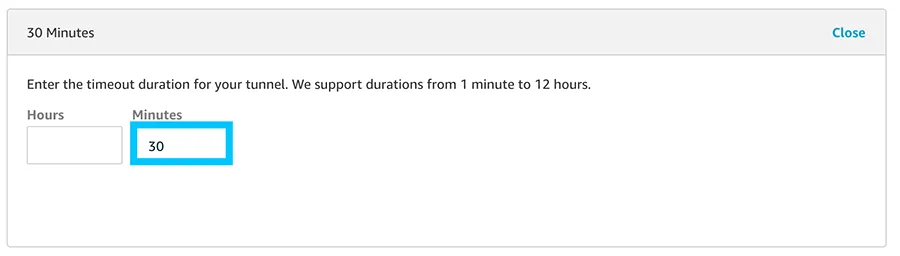
AWS IoT Secure Tunnel Timeout settings
When the tunnel is created, make sure to save a copy of the two files it asks you to download. Specifically we will need the sourceAccessToken.
Secure Tunnel Create [CLI]
Performing the same actions above with the CLI is just as easy.
aws iotsecuretunneling open-tunnel \
    --destination-config thingName=lila,services=SSH \
    --timeout-config maxLifetimeTimeoutMinutes=30
When a connection is opened, you should see a response like the following from your secure_tunnel program.
# [2019-12-24T09:03:54.438901]{2945}[info]    Starting proxy in destination mode
# [2019-12-24T09:03:54.453509]{2945}[info]    Attempting to establish web socket connection with endpoint wss://data.tunneling.iot.us-east-1.amazonaws.com:443
# [2019-12-24T09:03:55.888157]{2945}[info]    Web socket session ID: 12871efffedc21d9-00005e57-00015f58-73ec57264871633d-780e6658
# [2019-12-24T09:03:55.888385]{2945}[info]    Successfully established websocket connection with proxy server: wss://data.tunneling.iot.us-east-1.amazonaws.com:443
This tells you that a session has opened on the destination end. Take a copy of the sourceAccessToken that it spits out to your on the CLI for the next step. Now we must open a client on our end using the localproxy binary from before.
localproxy Client
In order to use the localproxy client, it will need to be built for your operating system. Unfortunately there aren’t binaries published for all of them so the best I can offer you currently is the x86_64 binary from before to use on a Linux operating system.
# Download the binary and make it executable
wget https://github.com/t04glovern/aws-greener-grass/raw/master/.blog/greengrass-secure-tunnel/binaries/localproxy-x86_64 -O localproxy
chmod +x localproxy
Open up a tunnel using the sourceAccessToken, along with providing the port you would like to tunnel through.
./localproxy \
    -r "us-east-1" \
    -s "5555" \
    -t "AQGAAXix2C93kcy5UyP3Hlyt5ckZABsAAgABQ......."

# [2019-12-24T17:14:26.690125]{8685}[info]    Attempting to establish web socket connection with endpoint wss://data.tunneling.iot.us-east-1.amazonaws.com:443
# [2019-12-24T17:14:28.104106]{8685}[info]    Web socket session ID: 0e4af2fffe6d4d67-00002f7b-00015ec0-45fd2fc3cba468d4-6860ed80
# [2019-12-24T17:14:28.104165]{8685}[info]    Successfully established websocket connection with proxy server: wss://data.tunneling.iot.us-east-1.amazonaws.com:443
# [2019-12-24T17:14:28.104485]{8685}[info]    Listening for new connection on port 5555
You should be notified that the tunnel is open and ready to use. In my case I have port 5555 listening. Now I can simply SSH to that port and provide the usually credentials I would have used to login to that device normally.
ssh pi@localhost -p 5555
Summary
Secure Tunneling is a fantastic way to provide encrypted, temporary access to remote devices behind a firewall in the field. I also see there being a lot of opportunity to make use of this service for device vending (more on this in future posts).
NOTE: It should be noted that tunneling in this manner could be considered a major security risk if keys fall in the wrong hands. I recommend working with your Security teams internally to ensure they are okay with the risks associated with opening SSL tunnels.
Please reach out to me on Twitter if you have any further queries or would like help designing your own system!