AWS Sumerian Magic Cube


In this post, we're going to go over the full implementation of a small example application using AWS Sumerian with AWS IoT connected devices. Sumerian is; at its heart, a simple scene editor for browsers with a bunch of game engine attributes that you'd expect from a 3D environment creator.
Before we jump into Sumerian, I'll give you an overview of the embedded code we'll be using in this post.
Hardware
Our embedded device we'll be using is one I designed and built out for over a couple of iterations at Hackathons over the last year. We proved our designs at the AWS IoT App Challenge where we won an honorable mention.
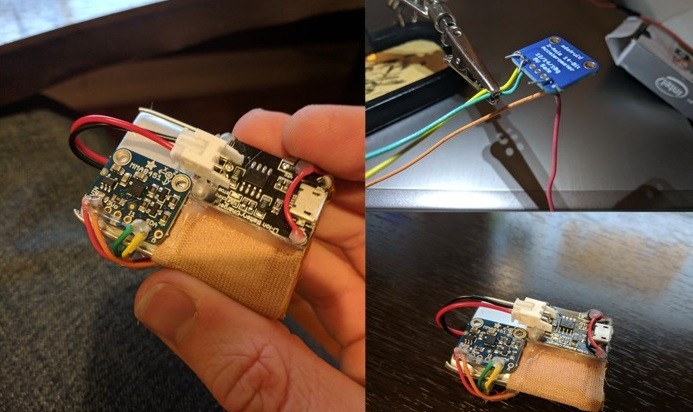
Bill of Materials
Note, prices vary; I would recommend checking AliExpress if you don't mind the wait.
- 1x - NodeMCU ESP8266 : $8.39
- 1x - Adafruit Micro Lipo w/MicroUSB Jack : $10.11
- 1x - Lithium Ion Battery 1000mAh : $9.99
- 1x - MMA8451 Accelerometer : $9.44
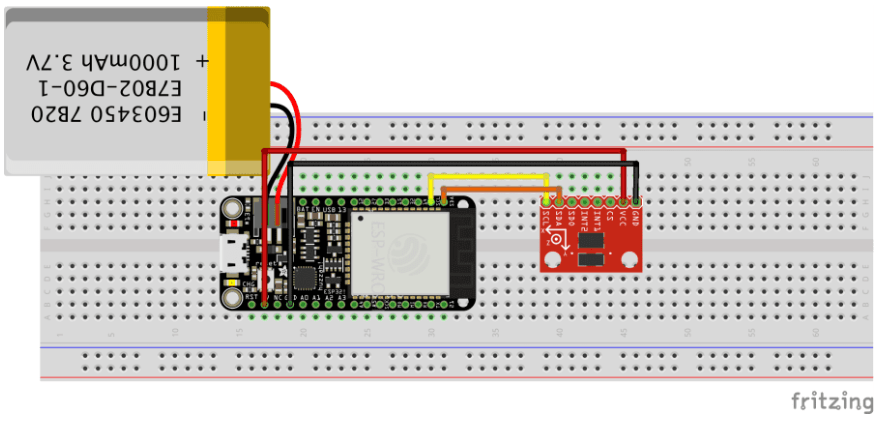
Device Schematic
The following is a very high-level schematic. It isn't entirely correct (excludes the Micro LiPo charging circuit).
Certificate Vending Machine
This project makes use of the IoT Certificate Vending Machine. Rather than repeat me I would recommend checking out a previous blog post Create a Private VPN using AWS IoT Button, SNS & CloudFormation where we go over in detail how to set it up. The code and technical instructions also live on GitHub
Firmware Flashing
The specific details for flashing the board will not be covered in this post, however, checking the README within the GitHub project will overview the specifics. At a high level, you will need to perform the following steps
- Download PlatformIO for VSCode
- Update/Create aws-iot-esp8266/src/main.h with your AWS MQTT Endpoint, client / thing name, PubSub topics & WiFi details
#ifndef MAIN_H

// Wifi Details
const char *ssid = "WiFi SSID";
const char *password = "wifi-pass";

const String thing_id = "devopstar-accl-01";

// AWS MQTT Details
const char* aws_mqtt_server = "xxxxxxxxxxxx-ats.iot.us-east-1.amazonaws.com";
const char* aws_mqtt_client_id = "devopstar-accl-01";
const char* aws_mqtt_thing_topic_pub = "$aws/things/devopstar-accl-01/shadow/update";
const char* aws_mqtt_thing_topic_sub = "devopstar/sumerian/accl-group";

#endif
Note: In this tutorial, you must publish directly to the device Shadow rather than the topic itself.
- Upload Certificates
## create the cert files based on the output from the Cert vending machine
openssl x509 -in aws/certs/certificate.pem.crt -out data/cert.der -outform DER
openssl rsa -in aws/certs/private.pem.key -out data/private.der -outform DER
openssl x509 -in aws/certs/root-CA.pem -out data/ca.der -outform DER
## Then upload the certificates using SPIFFS
pio run -t uploadfs- Build and Compile code to the device
Once you have these steps complete you should be able to give the sensor a shake and have it trigger the transmission of the raw accelerator data over MQTT to AWS IoT
[WIFI] WiFi connected on 192.168.188.52
[CERTS] Heap: 43424
[CERTS] Success to open cert file
[CERTS] cert loaded
[CERTS] Success to open private cert file
[CERTS] private key loaded
[CERTS] Success to open ca
[CERTS] ca loaded
[CERTS] Heap: 34912
[AWS] Attempting MQTT connection...[AWS] connected
[AWS MQTT] Publish Message:{"state":{"reported":{"a_x":-0.004788,"a_y":2.461239,"a_z":-18.78012}}}
[AWS MQTT] Publish Message:{"state":{"reported":{"a_x":3.744531,"a_y":-0.158017,"a_z":-19.6133}}}
[AWS MQTT] Publish Message:{"state":{"reported":{"a_x":0.545878,"a_y":-4.084508,"a_z":-9.888053}}}
AWS Sumerian
We have the hardware out of the way now, so let's focus on the real work which is to set up a simple scene in AWS Sumerian.
Cognito User Pool [Prerequisite]
You will need to set up a simple AWS Cognito User pool that the website that AWS Sumerian runs on with be able to use in order to assume the permissions needed to poll and update AWS IoT topics.
We'll use a nice script that was provided by the Amazon Cognito Setup guide. The CloudFormation template can be run using the following command
aws cloudformation create-stack \
    --stack-name "AmazonSumerianIotDataTutorialStack" \
    --template-body file://aws-cf/iot-thing-tutorial-template.yml \
    --capabilities CAPABILITY_IAM
Once deployed, run the following to retrieve the User Pool ID for the next step.
aws cloudformation describe-stacks --stack-name "AmazonSumerianIotDataTutorialStack" \
    --query 'Stacks[0].Outputs[?OutputKey==`CognitoIdentityPoolID`].OutputValue' \
    --output text
Create a Simple Scene
It should be first noted that this part of the tutorial (just the first bit) copies very heavily from the fantastic example on the Sumerian docs page titled IoT Thing, Shadow and Script Actions. If you would prefer to follow their docs, by all means, check them out; however we are expanding on the simple implementation they use in the post.
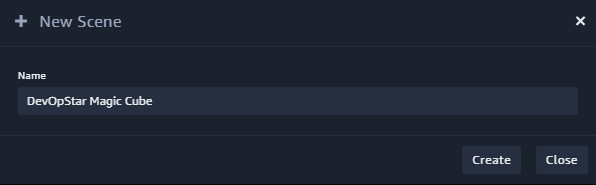
Navigate to the Sumerian dashboard and select a new scene. Give the scene a name and then hit Create
Once the scene editor has opened up; Click the name of your Scene in the top left to select it then on the right under AWS Configuration:
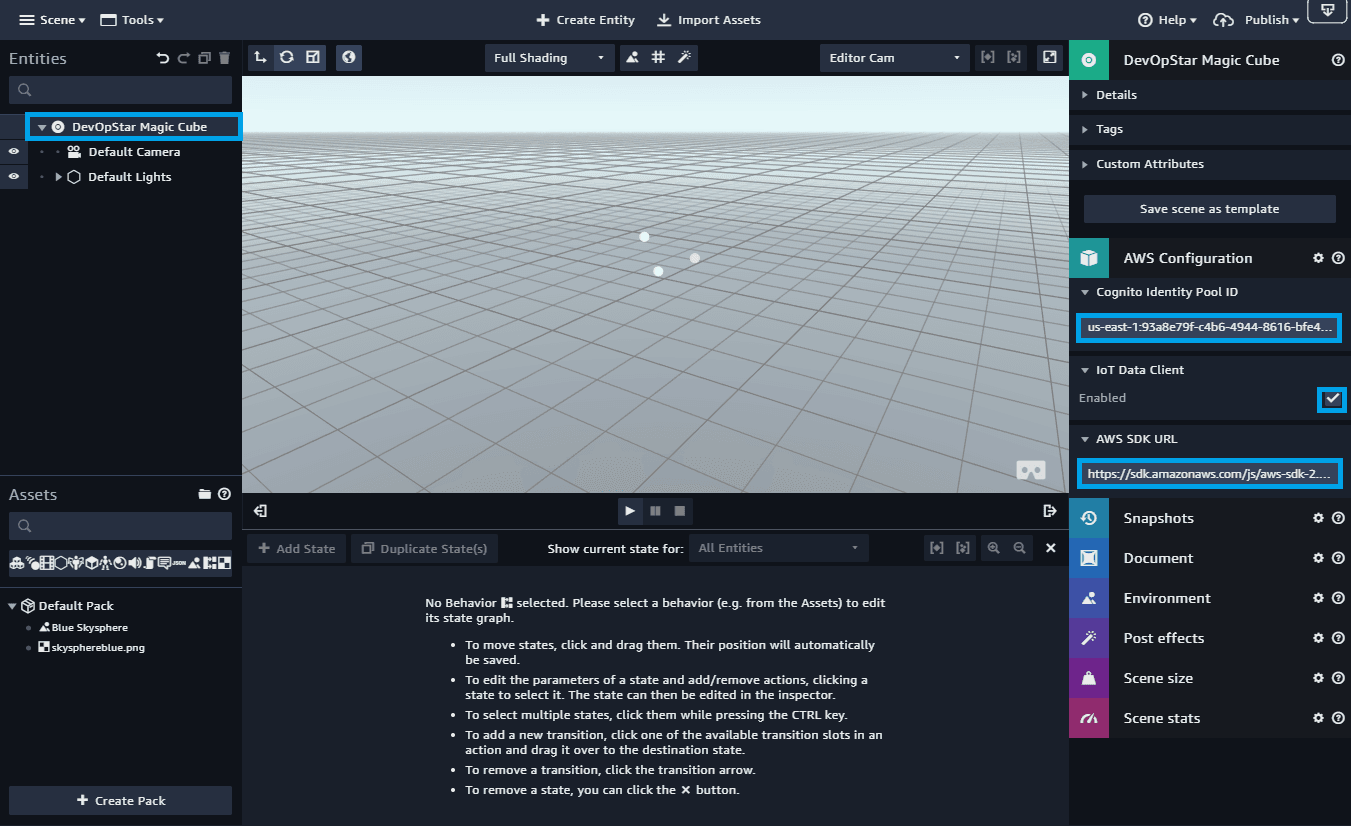
- Set the Cognito Identity Pool ID to be the value you go from your CloudFormation stack
- Enable IoT Data Client
- Update the AWS SDK URL to be: https://sdk.amazonaws.com/js/aws-sdk-2.283.1.min.js
Note: If you are reading this in the far away future, you can get the latest and greatest version of the SDK from HERE
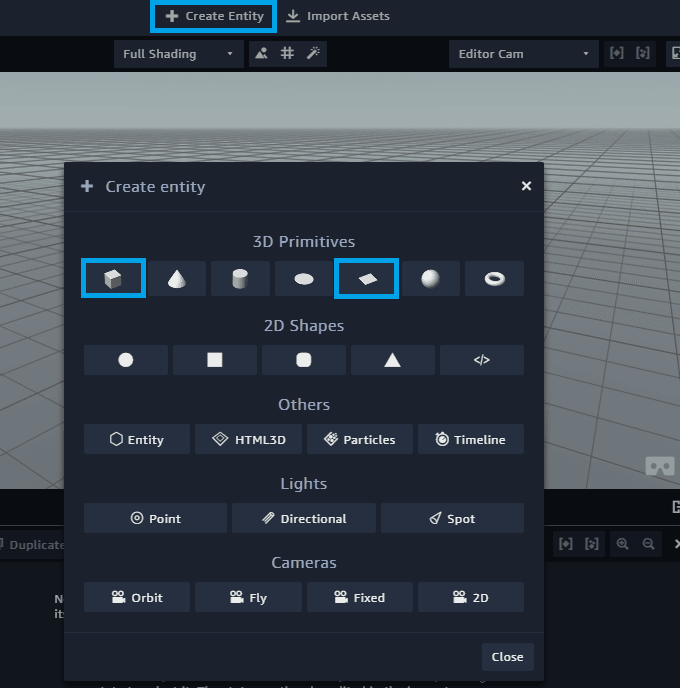
Add Entities to the Scene
Now the scene is prepared for development, we're going to create two Entities (Game Objects if you are use to Unity3D speak). Create a 3D Box, and a 3D Quad
3D Box Configuration

With the Box selected, open up its Transform Settings:
- Set Y position to 2
Then open up the Box's Material Settings
- Set the Color to a Red
3D Quad Configuration
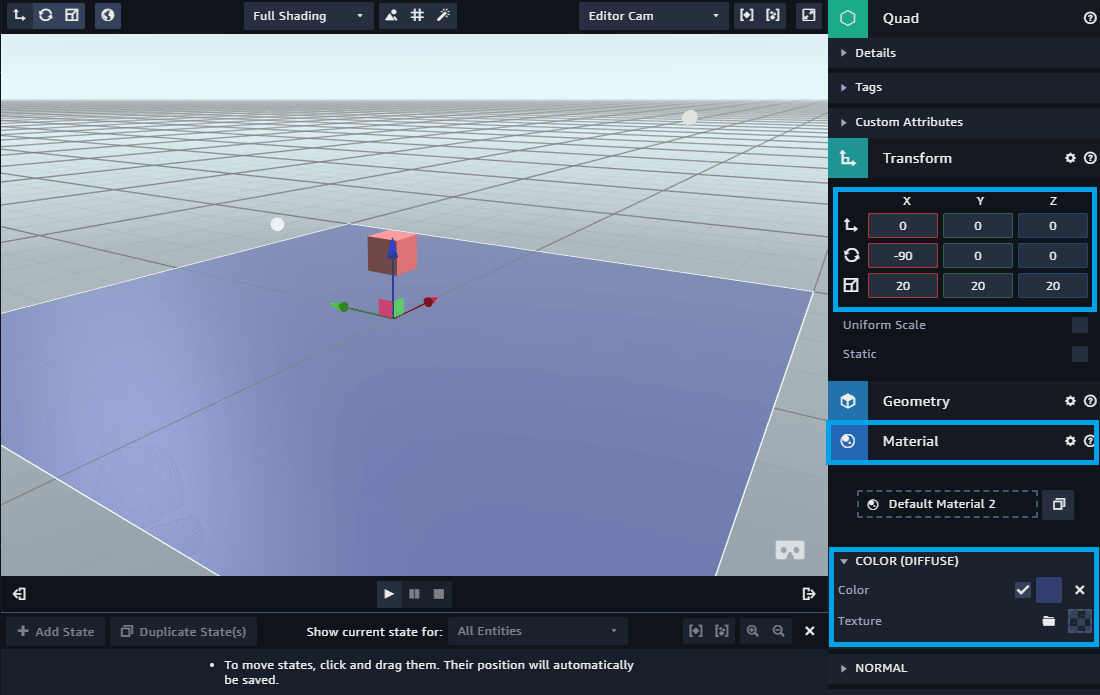
With the Box selected, open up its Transform Settings:
- Set X Rotation to -90
- Set X, Y, Z Scale to 20
Then open up the Box's Material Settings
- Set the Color to a Blue
Entity Collision
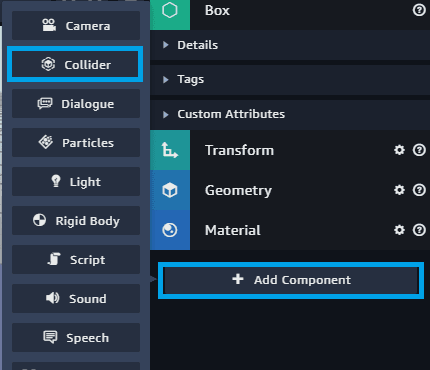
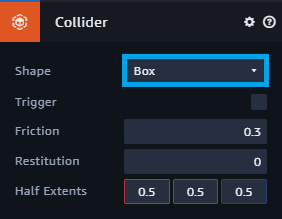
If you try pressing play on your Scene now you'll find that basically, nothing happens. This is because none of the Entities have any physics attributes. Let's go ahead and add a new Component to our Box by selecting Add Component under the Entity; then select Collider
Once the Collider has been added; confirm that the settings for it have it set to be a Box collider.
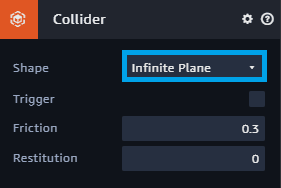
Perform the same steps for the Quad, except ensure it's set up with an Infinite Plane as its Shape.
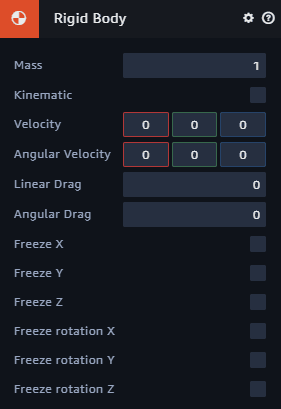
The final thing we need to add to our Box before gravity will work as expected is a Rigid Body. This allows you to define physics properties for the selected Entity. We only need this applied to our Box!
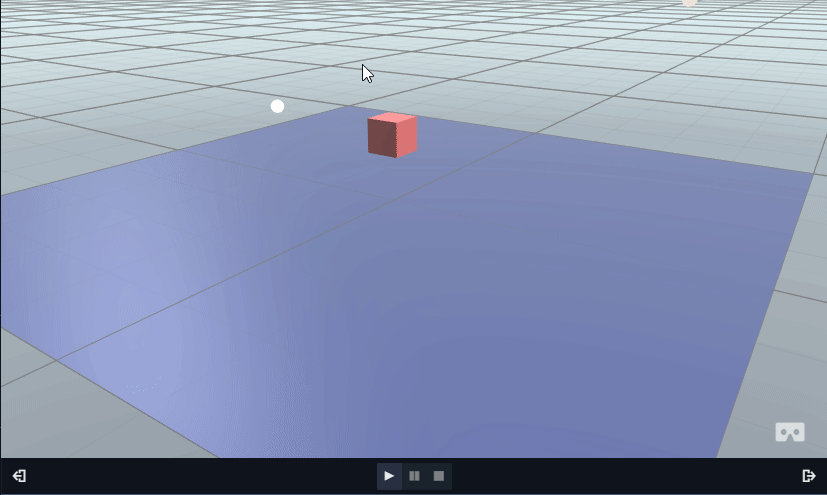
Press Play and give it a test!
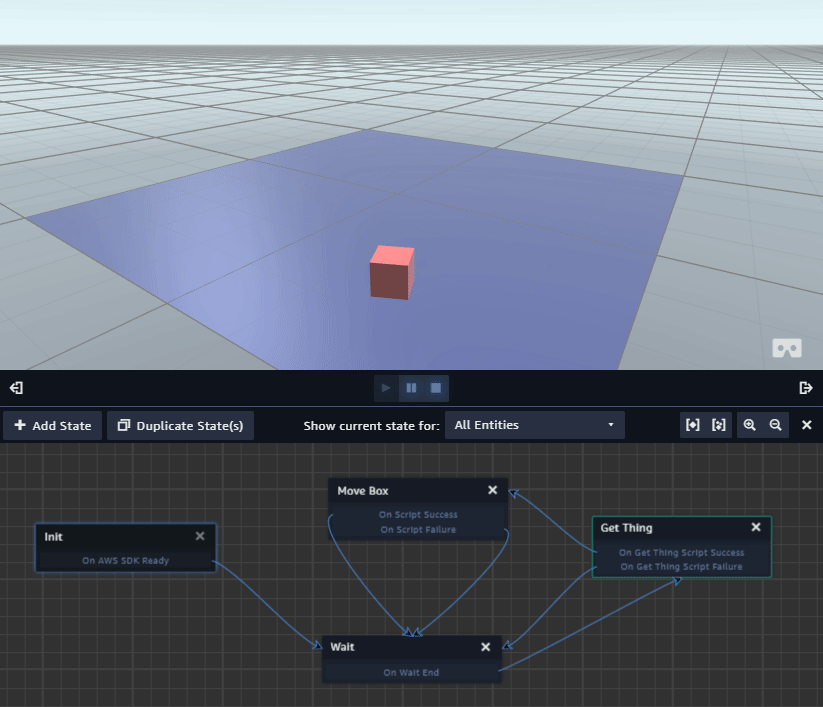
State Machine
We now need to work out a way to take the AWS IoT data from our sensor and pipe it to the Entity in a clean way. Luckily we have a Component called a State Machine for this very reason. The State Machine will allow us to attach Scripts to different States our Box is in. To begin, add a State Machine Component to your Box
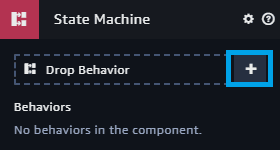
Click + to create a new Behavior. Within the Behavior (in the bottom State Machine panel) create 4 states with the names:
- Init
- Wait
- Get Thing
- Move Box
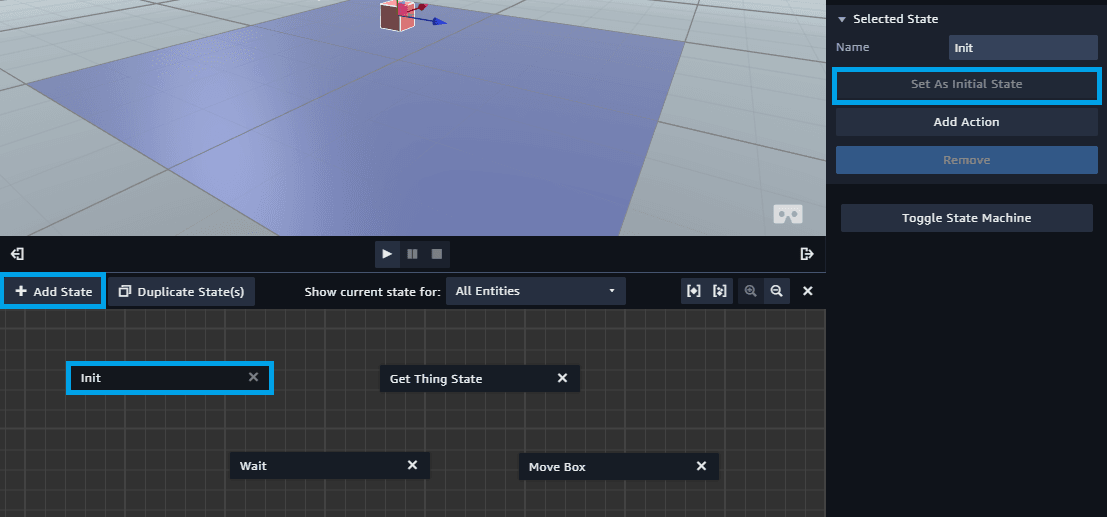
Also, ensure that the "Init" state has the Set As Initial State box pressed.
State Actions
For each of the four states, you will need to Add Actions. To do this, select the State and the in the right had Behavior panel, click Add Action
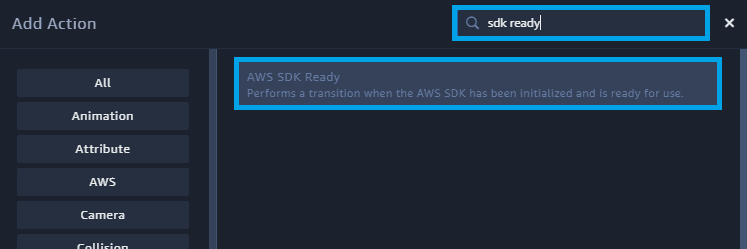
Init
Search for "sdk ready" and select AWS SDK Ready. This will ensure that the Init state on the Entity will proceed when the SDK is finished loading.
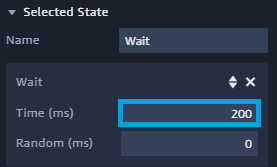
Wait
Search for "Wait" and select Wait. We're going to use this as our default state, before checking for a value in AWS IoT.
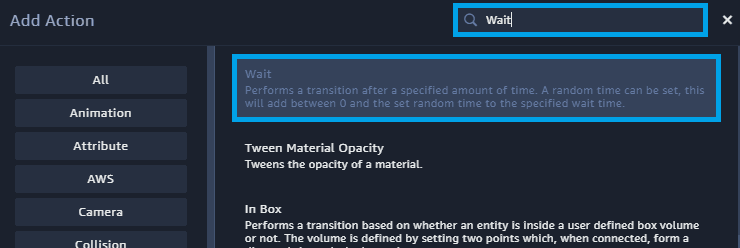
Then under the Settings for Wait Time, set the value to 200ms. This means that the State will wait 200ms before proceeding to the next.
Get Thing
Search for "Script" and select Script. This block allows us to add custom scriptable logic to our State Machine. On the settings for this Block click the + next to Drop Script. Edit the Script Name to be Get Thing Script and then add in the following code block.
'use strict';

function enter(args, ctx) {
	window.AWSIotData.getThingShadow({ thingName: 'devopstar-accl-01' }, (error, data) => {
		if (error) {
			console.error('Error getting state', error);

			return ctx.transitions.failure();
		}

		const payload = JSON.parse(data.payload);

		ctx.behaviorData.a_x = payload.state.reported.a_x;
		ctx.behaviorData.a_y = payload.state.reported.a_y;
		ctx.behaviorData.a_z = payload.state.reported.a_z;

		ctx.transitions.success();
	});
}

function exit(args, ctx) {

}

var parameters = [];
You should have an editor that looks like the following, with the script name on the left and the code on the Right.
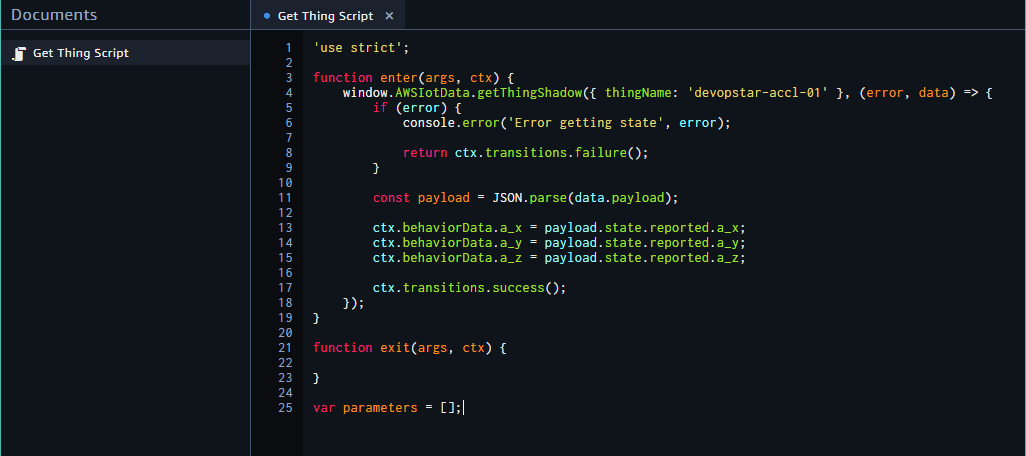
The code in this block is responsible for checking the value in the AWS IoT Thing device devopstar-accl-01. Then taking the values for a_x, a_y and a_z and blocking them into an item behaviorData within the Entities object.
Then once it has pulled the value successfully, it moves on to the next success state.
Move Box
For this action, it is very similar to the last; add a Script and Name it Move Box Script and add the following code
'use strict';

function enter(args, ctx) {
	try {
		var boxForce = new sumerian.Vector3(
			ctx.behaviorData.a_x,
			ctx.behaviorData.a_y,
			ctx.behaviorData.a_z
		)
		ctx.entity.rigidBodyComponent.setAngularVelocity(boxForce);

		if (ctx.behaviorData.a_x != 0 || ctx.behaviorData.a_x != 0 || ctx.behaviorData.a_x != 0) {
			window.AWSIotData.updateThingShadow({
				thingName: 'devopstar-accl-01',
				payload: '{\"state": {\"reported\": {\"a_x\": 0,\"a_y\": 0,\"a_z\": 0}}}'},
					(error, data) => { console.log(error) }
			);
		}
	} catch (error) {
		console.error('Error rotating box', error);

		return ctx.transitions.failure();
	}

	ctx.transitions.success();
}

function exit(args, ctx){}

var parameters = [];
Again, the code should look something like the following if done correctly.
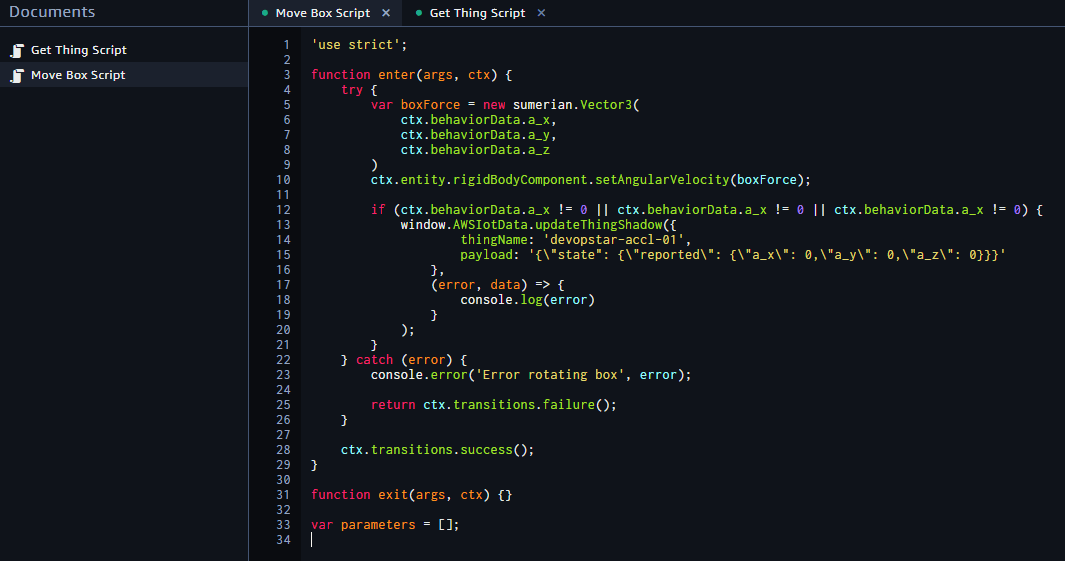
The Move box function looks more complicated than it is. The behaviorData from the previous success state is passed into a new Vector3 object. Then this Vector is applied to the Entity's rigid body as an angular velocity (hopefully making it move in the same direction as how we move the sensor).
Once a force has been applied, the shadow state of the thing named devopstar-accl-01 is updated with 0, 0, 0 so the same force isn't re-applied.
State Machine Transitions
Lucky last thing we need to do is to simply connect all the States Success / Failure nodes

Testing
Let's give this a try. Start running the Scene and connect the sensor to AWS IoT. Then give the device a shake.